Pages

Thursday, March 22, 2012

Coverstitch Tutorial


In my previous post, I mentioned giving you all a tutorial on the method I used for coverstitching. I only recently discovered this method and it has made such a difference!  I used to just eyeball the coverstitch and trim any excess fabric from the back. But with this method, you coverstitch on the correct spot every time and there is no trimming necessary!  The underside is perfectly covered because you stitched in exactly the right spot. So here is how:

I used the seam guide attachment for my serger but you can just as easily use a pad of post its or painters tape to mark the spot. So first you need to get one of these items. For those who are not sure what your seam guide attachment looks like, here is a picture.
Seam guide attachment with screws that attach the seam guide to the machine
After you have this, take your item with the hem already pressed or fused into place.  Then put it WRONG SIDE UP underneath the presser foot to gauge the right spacing to align your stitches to your raw edge.

see how my raw edge is aligned exactly where the two needles with the thread will hit?
Once you have it perfectly aligned, tighten the screws on your seam guide or stick your post its or painters tape exactly at the right edge of your hem.

here is the post-it pad aligned

here is the seam guide aligned and screwed down
 Now that you have your alignment exact, flip your fabric over so the RIGHT SIDE IS UP...the way you want to coverstitch. Align the right side of the hem with your mark. (Either the post-its, tape, or seam guide)
fabric flipped over and aligned with the guide
Now you can begin to coverstitch while keeping your hem aligned with your mark. The stitches will end up exactly on the edge of your hem because you already checked the alignment ahead of time!
me stitching my faux hem
Here is a picture of my finished "hem".
wrong side--see how the edges are caught perfectly? No need to go back and trim!
Front side...perfect coverstitch!

Piece of cake right?  I can't believe I was ever just eyeballing it!  This method makes it so much easier!  I hope this helps. Let me know if you have any questions...I'll be happy to clarify!

Happy Coverstitching!


Tuesday, March 20, 2012

Giorgio's Top

Part of the new Spring line from Silhouette patterns included this top, called Giorgio's Top. For those of you who are not familiar, Peggy Sagers (designer of Silhouette patterns) makes no secret of how there are no copyrights in fashion and she picks clothing items she likes from designer lines and remakes them as patterns for her line. (Check out her trench pattern---its the Burberry design!) This top is one from the runway of Giorgio Armani--hence the name Giorgio's top. It is essentially a basic princess seamed t-shirt with a cute flared peplum at the bottom.

I made the smallest size, size 1, and it is slightly big. I also made it completely on my serger. I just lined up all the pieces and serged down the seam. Next time I might take slightly deeper seam allowances...but it is probably only big because I used a slinky knit. I used this sparkle pumpkin slinky knit from fabric.com. I bet it will fit perfectly when I use a regular knit next time. Also, I am long waisted and love my shirts long...but even this one is a little too long. I may take off 1/2 of an inch next time. I also think my slinky knit was a little heavy (huh? normally they are so light!) to convey the peplum to the extent on the pattern picture. I will use a real lightweight knit next time as I love that feature. So hmm...maybe it wont pull down as long in a lighter weight knit so maybe I should not cut off any length until I see how low it pulls.

Per the instructions, I just folded under the sleeves and neck hem and top stitched using the coverstitch on my serger. For the hem, I used this 1 inch knit tape from Emma Seabrooke, and put it fusible side UP (away from wrong side of fabric), on the inside of the hem, and serged all around. Then I folded up that 1 inch hem, and fused it in place. Next I took it to my serger and cover stitched. (Please note that this tape does come in double sided fusible, I just happened to have this one sided in my stash already) I like the feel of hems on knits with this tape because it gives them a little body and keeps them from rolling in light weight knits.
back view
side view


Close up of front--that weird pucker is the shirt going over the button on my jeans

Stay tuned for my next post which will be a tutorial on the great method I used to coverstitch the hems. It makes everything line up perfectly on the back! No trimming required.

You can see my review of Giorgio's Top here.

Monday, March 12, 2012

A Trip Downtown to LA's Garment District

A couple posts ago I wrote about the outfit I wore to the Sew LA Colette Patterns book signing party. What I failed to mention was that I had spoken with a fellow sewer on patternreview about meeting up there. Of course, due to our complete and utter lack of planning, we completely missed each other. :( But don't be sad! The story gets fantastic!

This fellow PR member, Nhi, ended up meeting two other lovely ladies at the party and they made plans to go to the garment district and shop up a storm. Nhi, being the thoughtful person that she is, decided to invite me along even though I had never met any of them! I was so excited and touched!

We all met up this last Saturday and shopped until we dropped. Dropped literally. I was so exhausted. We went from 9:30 am meet up at the Loft of Michael Levine and left around 4 or 4:30. And we scored big time! If you are willing to scavenge and almost turn the boxes upside down, you can find some good stuff in there. And it is only $2.50 per pound!! POUND! I will show you my haul in another post because it is currently in the washing machine.


Now of course I had never met any of these girls before but was that an issue? Not in the slightest! We spent all day laughing and talking. I had a blast. Nhi introduced me to Sandra, and fellow blogger Jill. (from whom I stole our picture below...she has made some really adorable items on her blog...go check it out!) We all were also wearing something we made. These are some talented ladies! I cannot wait to see what they make with the fabrics they got! 
From left to right: Jill, me, Sandra, and Nhi (You are seeing a sneak peak of my Renfrew shirt!)

We went all over the district and I definitely found many much wanted needed pieces of fabrics. But of course, since I am on a mission to find hot pink and black houndstooth medium weight woven fabric, for my Galaxy dress, Vogue 8280, it was nowhere to be found. Any readers have any clue or happen to have some by them? I NEED it! I want to make the dress to wear to my sister in laws wedding in May.

This day sounds pretty exciting huh? But wait! There is more! I met mimi g!  You all know mimi g right? Of sewing and blogging fame? I recognized her at the cutting counter at Michael Levine's and I think creeped her out just a little by running up to her and calling her by her name. Yes...I now realize that is creepy. Oops. But it all worked out and she was super nice. I told her what a fan I was of her blog.

Side note! She mentioned me in her blog. And even remembered my name! Is that not the sweetest thing you have ever heard? I am so touched. I was nervous of going up to her originally but the girls convinced me and now I am so glad I did. She was the nicest...and of course extremely fashionable...as I am sure you can tell by her blog. I am here to tell you that yup...she lives up to the hype. Just as gorgeous in person!

Thursday, March 8, 2012

Red Dress Contest

A few weeks ago, I published about my entry into my first Patternreview contest...the Red Dress Contest. Voting has now begun. If you like my entry, please vote for it here. My username on Patternreview is Spaiyq. My entry was this great Colette Patterns Peony I made out of fun, yet classy, Halloween themed fabric.

There are a ton of cute dresses entered in the contest so make sure to check out the other entries too! Thanks for voting!

P.S. In case you are wondering, as a little side note, what the hell Spaiyq is, I will tell you. Remember Buffy the Vampire Slayer the TV show? (best show ever?) and remember the impossibly dreamy Spike?  Well in season 2, episode 3, School Hard, he first introduces himself to us and says his name. Now Spike in the show has a British accent. So he says Spike with a British accent when he tells us his name. And Spaiyq is my attempt to spell it phonetically the way he says it when introducing himself. Makes perfect sense right????  (Lol..keep in mind I started using this name 15 years ago.)

This is the screenshot right after he tells us his name.....remember those good times readers?

Wednesday, March 7, 2012

Vogue 1178

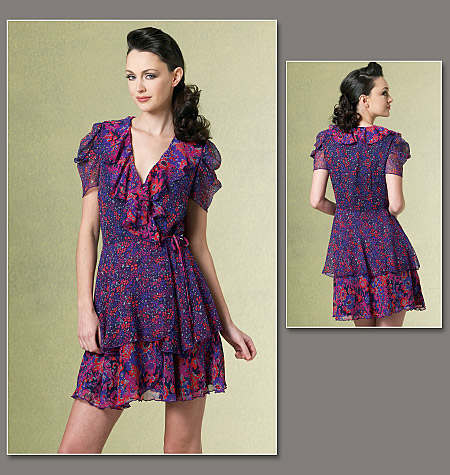
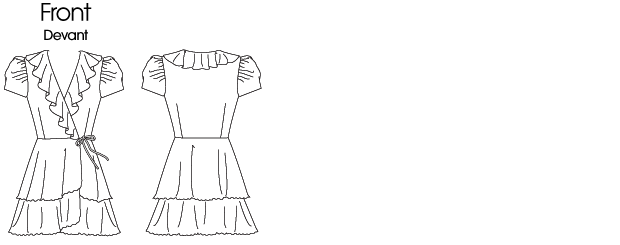
I made this dress about 1 year ago to wear to a good friends wedding. This dress was almost never made! I saw this pattern, Vogue 1178, when it first came out and completely passed over it. The picture of the model and the dress does not appeal to me at all. But later on I saw the line drawing and realized what an adorable dress it was! Plus it doesn't hurt that it is an Anna Sui design...she designs amazing clothes!
I immediately bought some Amity style fabric... (Halloween colors see?) and got to work. I used polyester chiffon for the top layer and the ruffle layer. The polka dot one I got on ebay and the black chiffon has black sequin type things...more like large sparkly dots periodically and I got that at Joann's. I also used my favorite polyester lining...it does not feel silky it feels more like a georgette. I love the feel of this kind of lining vs the slippery satiny feel of linings for jackets and things. I think each type of lining has its place. I like this polyester/georgette feeling kind for directly against my skin. 

This pattern was rated average and I believe it was done so because of the tricky type of fabric you are supposed to use and the miles and miles of teeny tiny little hems. Um...no. I was not about to do that. I used my serger for the majority of the construction. I did rolled hems on everything I could. I used this gorgeous serger thread from Superior Threads called Halo.  The two colors I used were Snowfall and Jet Black Silver.
With this method, construction was easy. There is one thing to note though. I guess I never noticed the weirdness of the sleeves in the picture. When I made up the sleeves and tried them on, I thought at first I had done something wrong because they looked so odd! But a careful glance at the cover photo shows that the dress has those weirdly poofy and tucked sleeves. So I went with it. A lot of the reviewers were in love with the sleeves...if I made this again I would probably just used a traditional gathered sleeve instead of doing all the tucks that gave it kind of a weird shape when it was on.  One other change I would make is to the front wrap piece. If you look above at the line drawing, you can see how the edge is rounded at the bottom of the piece that wraps over the top. It lays unevenly on me and I would square that off if I made it again so it would lay flat instead of pulling to the left slightly. All in all, the pattern was much easier than I would have anticipated.
close up of weird sleeves.....isn't my husband the most handsome man ever???  <3

As far as fitting goes, I had to take in the bodice 1 1/4 inches on each side. And as a result I took some tiny tucks in the skirt to make it fit the new bodice size. That was the only change I made. There was no gapping problems or anything else. Pretty lucky huh?  I used silk thread for the construction but in hindsight, it made it made it more difficult to sew and more puckers were occurring. Half way through I grabbed Sandra Betzina's More Fabric Savvy and learned I should be using polyester thread to sew chiffon to avoid puckers. Oops....so keep that in mind readers!

Here is an in person shots....sorry about the weird angle.  It is one of the few full length pictures I have from that wedding.
 
Me and my adorable husband

You can see my review here on Patternreview.com.

Wednesday, February 22, 2012

Spider Peony

On February 18th, Colette Patterns had a book signing party and trunk show at Sew LA. You could receive 20%  off all Colette patterns but if you wore one of her designs, you could get 30% off! Now I had been planning on making a Peony for some time and had some fabric set aside for it...and guess what? The fabric was red! So not only was it perfect for me to make for the event, I can also enter it into the Red Dress contest on pattern review and use it for the Sew Weekly theme from last week---red. (You can see my entry here. I am not a contributor because I did not know at the time, but I did apply....it said they were still accepting people...but I have not heard anything yet.)
Fabric detail close up---those are not wrinkles! Those are the striped gradation in the fabric

For this pattern, I did make a muslin of the bodice because I know Colette patterns are designed for bustier gals than I. Of course I somehow convinced myself the muslin fit...no idea what I was thinking...and went and sewed it than way. Of course it did not fit! So I made up some changes that resulted in an SBA but it is not the correct way to do it if you do it before you make up your garment. I went to the waist dart and moved the dart legs each in a half inch on each side...so the darts were each 1 inch shallower...and i continued the line up to the same point as before. Seemed to work...because the bodice fits perfectly now. I also altered the bodice to be 1/4 inch longer...or I intended to anyway. I did the front bodice correctly while I was tracing off the pattern...and while I was not thinking, I traced the back bodice off 1/4 inch shorter---I moved the paper the wrong way! So the front and back bodice were 1/2 different from each other. I just eased the back 1/4 inch and cut off the other 1/4 inch so the bodice ended up being the exact same size as the original pattern!

Another change I made was to add piping to the sleeves and the belt....it ended up being a super cute detail but I of course did it because adding piping is yet another way I cheat around hemming!


sleeve piping detail
piping detail on belt and spider broach!
If anyone wants a tutorial on how to use piping in place of hemming let me know...I can do one but I just figure you all know this trick by now. To make this piping, I used the Clover wrap and fuse piping and ironed the Wrights gold lame bias tape around it..ironed on low!  I melted some of it right off when the iron was on high...I also used the Clover mini iron to iron it because it was very hard to use the large iron to press the fabric around the fusible piping. You can see my detailed review of the Wrap 'n Fuse piping here.What can I say? I'm a gadget girl! I love anything that makes it easier and faster...I want my finished garment!  But of course I also want quality...so I am careful to try and strike a careful balance.

Back belt detail
excess belt room


I love this dress so much...I have plans to make another. I loved it the minute it came out...this is actually the first Colette pattern I ever bought and I'm glad I made it work so well. I have a couple more pictures to show you more details.


Awesome shoes...and awesome puppy!


A couple things, the back belt, if you can see in the above picture, pulls some...but its not tight so I dont understand the pulling. I think on the next belt I might try a vertical buttonhole and see if it helps with the pulling because on the pattern, it was a horizontal buttonhole and I am wondering if that is what is contributing to the pulling. Just something to mention.

Also, I wore my fun makeup to match the dress! I only get to wear conservative "court" makeup so often nowadays, I never get to wear to the fun colors so I definitely took advantage of the opportunity. Sarai (Mitnick---Colette Patterns designer) even commented on my matching makeup!
Gold eyes, red lips


Scary close up eye makeup shot!!


This will be the first contest I am entering on PR. I'm excited! It was also the first Sew Weekly post that I made. I hope you all enjoy my entry!  Also, I did this entire project from my stash! Did not buy one new thing for it...crazy! I am not sure I have ever done that before! One last thing of note--can anyone spot the problem with the dress?  It's here in the post...anyone notice it???? 

What do you all think of my fabric? Classy enough? Or too Halloweeny?  I try very hard to strike a nice balance between spooky and elegant---you should have seen my wedding! Perfect example. I think this fabric fits the bill perfectly. Love!

Check out my review on PR here.

Saturday, February 11, 2012

Butterick 5559 and Tutorial on Hemming

My cute Buffy had to jump in the pic


I had been seeing this dress, Butterick 5559 by Maggy London, reviewed for awhile and I had to make it. I read about the difficulties of marking and had doubts about my motivation to complete this dress because marking is my least favorite part! But I took my trusty Frixion pens and marked the right side of the fabric with the tucks. I just folded up the tissue and drew the lines.You can read my review of the Frixion pens here.


If you don't yet know about Frixion pens, they are pens that were originally developed to be erasable by friction. But as it turns out, the heat of the iron erases the marks. (They also wash out) These pens have been a huge hit in the quilting world but I haven't noticed anyone mentioning them in the garment sewing world so I thought I would make a special mention. These pens made marking the tucks so much easier than the routes others had to take and they just iron right out!  Of course I tested on a scrap before I began marking. The only thing is I had to sew all the tucks on each piece before ironing them down so the marks would not disappear...but I don't think it harmed anything. The tucks were not affected at all.
haha...look at little Wednesday's paw

Aren't they gorgeous?
I made a straight size 8 in a golden yellow ponte knit. The trim on the sleeves and the hem is a brown ponte knit. The size 8 is slightly large in the hips and I might go back and take in the side seams a little there but I'll see what you guys think first. The only alteration I made was to take in the lower edge of the armscye in an inch...and therefore made the sleeve smaller at the bottom by one inch. I felt like the golden yellow might be a little too strong all on its own (even though I love it...yellow is my favorite color!) plus my favorite shoes in the world were this color yellow leather with a leopard trim--Marc Jacobs--so I added the brown trimming. I LOVE these shoes...I have had them since early 2005. I even wore them in a torrential downpour, through  tons of puddles, and they looked ruined and the next morning?? pristine condition! That's what you get with great quality...but I digress...as this post is not about shoes!

Another reason I added the brown is because I loathe hemming! And it just made it that much easier to complete the dress. This is a method I use on knits a lot...and I believe its the method used in the new Renfrew top from Sewaholic. I am just guessing based on the ones I have seen--I don't have the pattern..but I want it! I don't know how many people use this method so I thought I would post a little about it. 

First I decided how much brown I wanted to show and ended up cutting a crosswise strip of the brown  at 2.5 inches. I cut crosswise because that was the way the stretch of the fabric went and I needed the stretch to match the hem of the garment where I had the stretch going around my body. Next I ironed the strip in half. Then I placed raw edges of the brown to raw edges (where I want to hem) of the sleeve. I did this on the sleeves before I set them in.
Raw edges together (Sorry the stitching is already there...I did not think to take pictures until it was complete

Then I stitched with a quarter inch seam all the way to the end for the sleeves. For the hem, I measured the amount that was needed and added a half inch for seam allowance and sewed the strip in a circle before placing it on the hem and sewing the quarter inch seam. The circle was not needed for the sleeves because they were still lying flat and not inserted into the garment.

Next press the seams up towards the garment. Then we are going to top stitch extremely close to the seam to hold the inner seam allowance down...and plus it gives a nice finish.  Also a little tip...use your edgestitching or blind hem foot. I am using the blind hem foot here and I set my needle almost as far as you can go to the left...two from the farthest left and ran the center of the foot (the blade) along the ditch.  Below is a picture of my machine settings which show the dot two from the left position so you can see where I had the needle positioned. Also a picture showing how to use the edgestitching or blind hem foot to do this kind of stitching.

my blind hem foot running in  the ditch


machine settings


And this is what it will look like when you are done. Two really close rows of stitching on the inside and the seam allowance on the inside is held down on the inside so it doesn't flop around.

Finished seam from the inside

And now for the big finale! I know you all are dying to see some in person shots of the dress! But first, my bragging shot. By reading all the reviews, I knew matching the tucks at the side seam would be hard...so I paid extra careful attention when matching them up and pinned in more than 5/8's so they would match. If I just pinned at the edge, they would have been out of alignment where the seam was stitched. So because I was forewarned...I ended up with side seams like this!


matched side seams!

And now for the shots on me...I kept my hair out of the way so you could see the neckline on both the front and the back...and don't miss my shoes!
back
Front


I hope this helped someone! And please ignore my giant watch in the picture...I should have taken that off...it is a nice dress after all :-) You can also check out my review of this dress here.

Monday, February 6, 2012

Magna Hoop vs. Snap Hoop

I own both the Magna Hoop and the Snap Hoop. Because my embroidery machine is a Babylock Ellisimo, I was able to get the snap hoop as soon as it came out. I have now used both of them enough times and tried them on a significant variety of projects that I now feel comfortable reviewing them for you all.

My personal preference of the two is the Magna Hoop. Now I can hear all of you screaming your love for the Snap Hoop---the Snap Hoop is great also!  They both work for very different things....it just turns out that the type of embroidery I tend to do more often works great with the Magna Hoop.

So, first things first. Magna Hoop is NOT A HOOP! I think that is the biggest misconception. Magna Hoop only works with the hoops you already own for your machine. Magna Hoop is simply inserts for your hoops. This works well if you are often embroidering on oddly shaped items such as clothing pieces or quilt blocks, purse pieces, towels, etc. It holds the fabric down in the hoop in every area but where you are embroidering. So this gives it more stability than say, just using a sticky stabilizer.
Example of the 5 x 7 Magna Hoop-the other sizes come with different shaped inserts
Here is also a link to a video Eileen Roche (the inventor of both hoops and editor of Designs in Machine Magazine) did on describing the Magna Hoop. I also want to include a link to her blog where she writes about the comparisons between Magna Hoop and Snap Hoop and when and she uses each one and why. That post can be found on her blog here.

Now the Snap Hoop is an actual hoop.


This hoop makes squaring up fabric and getting rid of puckers easier. This is because the top of the hoop is magnetic and does not latch in like normal embroidery hoops. Therefore the fabric can be slid around underneath it until it is square and has no wrinkles. This cannot be done in a regular hoop because of the tightness of its grip and the probability that it will cause puckers if you pull after hooping. Here is a link to Eileen Roche's video on the Snap Hoop.

Now the reason I prefer the Magna Hoop is simply because of the type of embroidery I tend to do. I do a lot of onesies so I bought the 4 x 4 hoop to make hooping square easier. Problem is, it does not hold tight enough for the small 6-9 month onesies I embroider. These are TINY! So I have to pull the fabric all around the hoop and stretch and hold it so the presser foot doesnn't catch it while it is embroidering. With all this pressure, the snap hoop magnets tend to slide whereas the normal embroidery hoop holds everything tight. So the Snap Hoop simply does not work for me for this purpose.


Additionally, the Snap Hoop is not good for applique...which I also do a lot of! You do not want to have a ton of stitches on baby items so applique designs are better than fill stitch designs for baby clothes. The instructions that come with the Snap Hoop even caution about using it for applique because of the potential for the fabric to slip around with the constant removing of the hoop from the machine and manipulation to cut around stitches for applique. However, Eileen Roche has found a solution for this problem. If any of you have any of her Stipple collections, you can see in the videos she does them in the Snap Hoop. Now why does this work?  This is because her applique designs in the Stipple collections are all raw edge. She does layer after layer in the hoop until the entire design is done. Only then does she remove the hoop and cut around all of the edges. By doing it this way, she removes the possibility of the fabric slipping from the constant removal of the hoop from the machine by not removing the hoop until it is done. (You can see this process in a video here.)

This is a great idea if you like raw edge applique! I happen to use the more sturdy satin stitch around the edge of my appliques but again that is because I do a lot of baby items and they get washed frequently and it will hold up better. The kind of items that the Stipple kits make won't need that amount of sturdiness and it works well.

 The point of me writing this post is to make sure you are all well informed on the pros and cons of each item. I still use the Snap Hoop on plenty of other items. It was just that it was not ideal for the main items I had bought it for or regularly do.

Wednesday, February 1, 2012

Black Ponte Pants

I recently decided to participate in the Wardrobe Basics Sew-Along put on by the wonderful Girls in the Garden blog. Our first order of business was what was called the black ponte pant!  Now this could not have come at a more opportune time. I had just received my Silhouette Patterns 3 Piece Yoga Pant pattern and had some gorgeous black rayon poly lycra knit left over from what I used on my bridesmaids dresses (more to come on that later!).

There is the front silly shot of me wearing my new Yoga pants. They fit perfectly and work well with heels which is important for work. Also, they are elastic waistband so they are extremely comfortable. Just like the description of the pattern, the pattern is 3 pieces. A front, a back, and a waistband.

Now I have made tons of pajama pants and I am perfectly comfortable at putting on an elastic waistband. In fact, I make all my pajama pants entirely on my serger. (It is a Babylock Evolve so it has coverstitch capabilities) So I did the same thing here. I used my serger for the entire yoga pant. Only my attempt at putting in the waistband was disastrous! It definitely was not the patterns fault, I think it was the elastic I was using. It barely stretched at all. I got some heavy duty stuff called waist band elastic or something. In the future I will just use the regular pajama or underwear elastic.
back view

So as a result of this heavy duty elastic, the waistband didn't stretch to fit quite properly. So I had to undo the waistband and I stitched it first on the sewing machine and then took it over to be serged and that worked just fine. I do not think I will need that extra step when I use the different elastic next time.

Ok so now for the fun stuff! Any of you who do not yet know about Silhouette patterns, Peggy Sagers, or their webcasts need to go over there stat! I say this because not only are all her webcasts amazingly useful, but she has one specifically on yoga pants! She shows you some neat tricks to get cool different waistbands and even describes how you can use this pattern with a woven for a more professional looking yet still comfortable pant! Now I know you all want a back view to see the fit so...here you go!

I cut a straight size 4 (the smallest size) and made no alterations whatsoever. I thought for sure I would need to shorten the crotch length or make the waist smaller or something! But nope! Not a thing. She even mentions that repeatedly that there are so few alterations people need to make with these specific pants because they are so forgiving. The one thing to take note of though is that the 4 is not marked on the waistband piece for some reason. All the other sizes are. But easy enough, I just used the same measurement as is between all the other sizes and used that to measure where the 4 cutting line would be.

All in all, I had a great experience and I am so excited to have the first item done in the first sew along I have ever participated in. I hope this inspires some of you to make your ponte pants! Lastly, I will leave you all with....

a silly picture of me in my new pants! You can see my review here.

P.S. The pictures on the front of Silhouette patterns displaying the garment are horrendous! HORRENDOUS! Just ignore them and look at the line drawing or a review on PR or on her webcasts. These garments can be truly gorgeous!
Locations of Site Visitors