Pages

Sunday, January 23, 2011

Road 2 CA!

I went to Road 2 CA on Friday and WOW. WOW. This show was amazing! Far better than the International Quilt Show in Long Beach. For those of you not familiar with Road 2 CA, its a large quilt related show that has hundreds of vendors and anything you can dream of to buy...and usually each retailer has a show related deal that is amazing and you cannot get the deal anywhere else. There were a couple of really cool vendors that I want to tell you about.

First off, Little Windows. Ok, now I saw these guys at the Long Beach show and I was only mildly interested. Now, in the last 6 months since that show, I have imagined all these cool things I can do with it and I had a million questions for the vendor when I was there. And guess what? I got it...stay tuned to see what cool things I make with it. I'm not sure about what pictures I can use to show you what it does, since I have not yet made any, so I will just put this one pic I found on google images up and then click on their link above to see all the other cool stuff it does.  You can make anything you can imagine, such as rings, keychains, necklaces, ornaments, anything you can imagine really!
What I plan to do is to make some buttons for this jacket I want to make soon. I got this great black and orange argyle print fabric and I really wanted glittery, heart shaped buttons. Little Windows to the rescue! I plan to make some heart shaped domed pieces with orange glitter in them or an orange glittery piece of paper in it and then drill the holes to make buttons. They will be beautiful!  I can also put some skull pictures in the molds and have fun skully jewelry..all kinds of things. It looks like so much fun!

Also, I have been very into puzzles lately. It has been puzzle after puzzle at my house! So at the show I found all these cool fabric and quilt related puzzles to do. I'm so excited! I don't remember the name of the vendor but they only do shows and nothing online so I cannot refer you to them anyway.


Next I saw this absolutely gorgeous quilt jewelry made of clay. Sooo beautiful! The company is called Quilted in Clay. The colors and jewelry is so vibrant and the quilt blocks and designs are so sharp yet tiny. It's really amazing. I meant to go back and pick up some because I was rushing through on my first run and then I ran out of time!!  But I will be perusing the website and picking something up. Especially since she now makes my favorite quilt block--Snails Trail. The picture to the side is a beautiful brooch.

I also took a lecture on thread while I was there from the owner of Superior Threads. I received my very own Phd. in Threadology. I am now an expert! I had learned all the information before partly from researching many sites and watching the lecture they have posted on YouTube. Hearing it all again is so helpful. So many people do not realize how much of a part thread plays in making your machine and projects run smoothly. Here is one major tip. Use a topstitch needle!!! For everything except knits or extreme thicknesses and layers. For knits use a ballpoint/stretch (same thing) and extreme thicknesses use a jeans needle. Otherwise, for everything, use a topstitch needle!

At another vendor, there were these incredibly cool patterns at this vendor called The Vintage Spool. This spectacular pattern developed as a BOM (Block of the Month) called Happy Hauntings. It is a lot of applique but for someone like me who loves Halloween..this pattern is perfect!  The way it is made is softer, muted colors and made to go with many kinds of decor. Even more my style is their new pattern called Eeeek! If you go to the link, the quilt is the second picture down and so bright and colorful! And with a little vampire and my favorite part??  The poisons at the bottom...so cute!

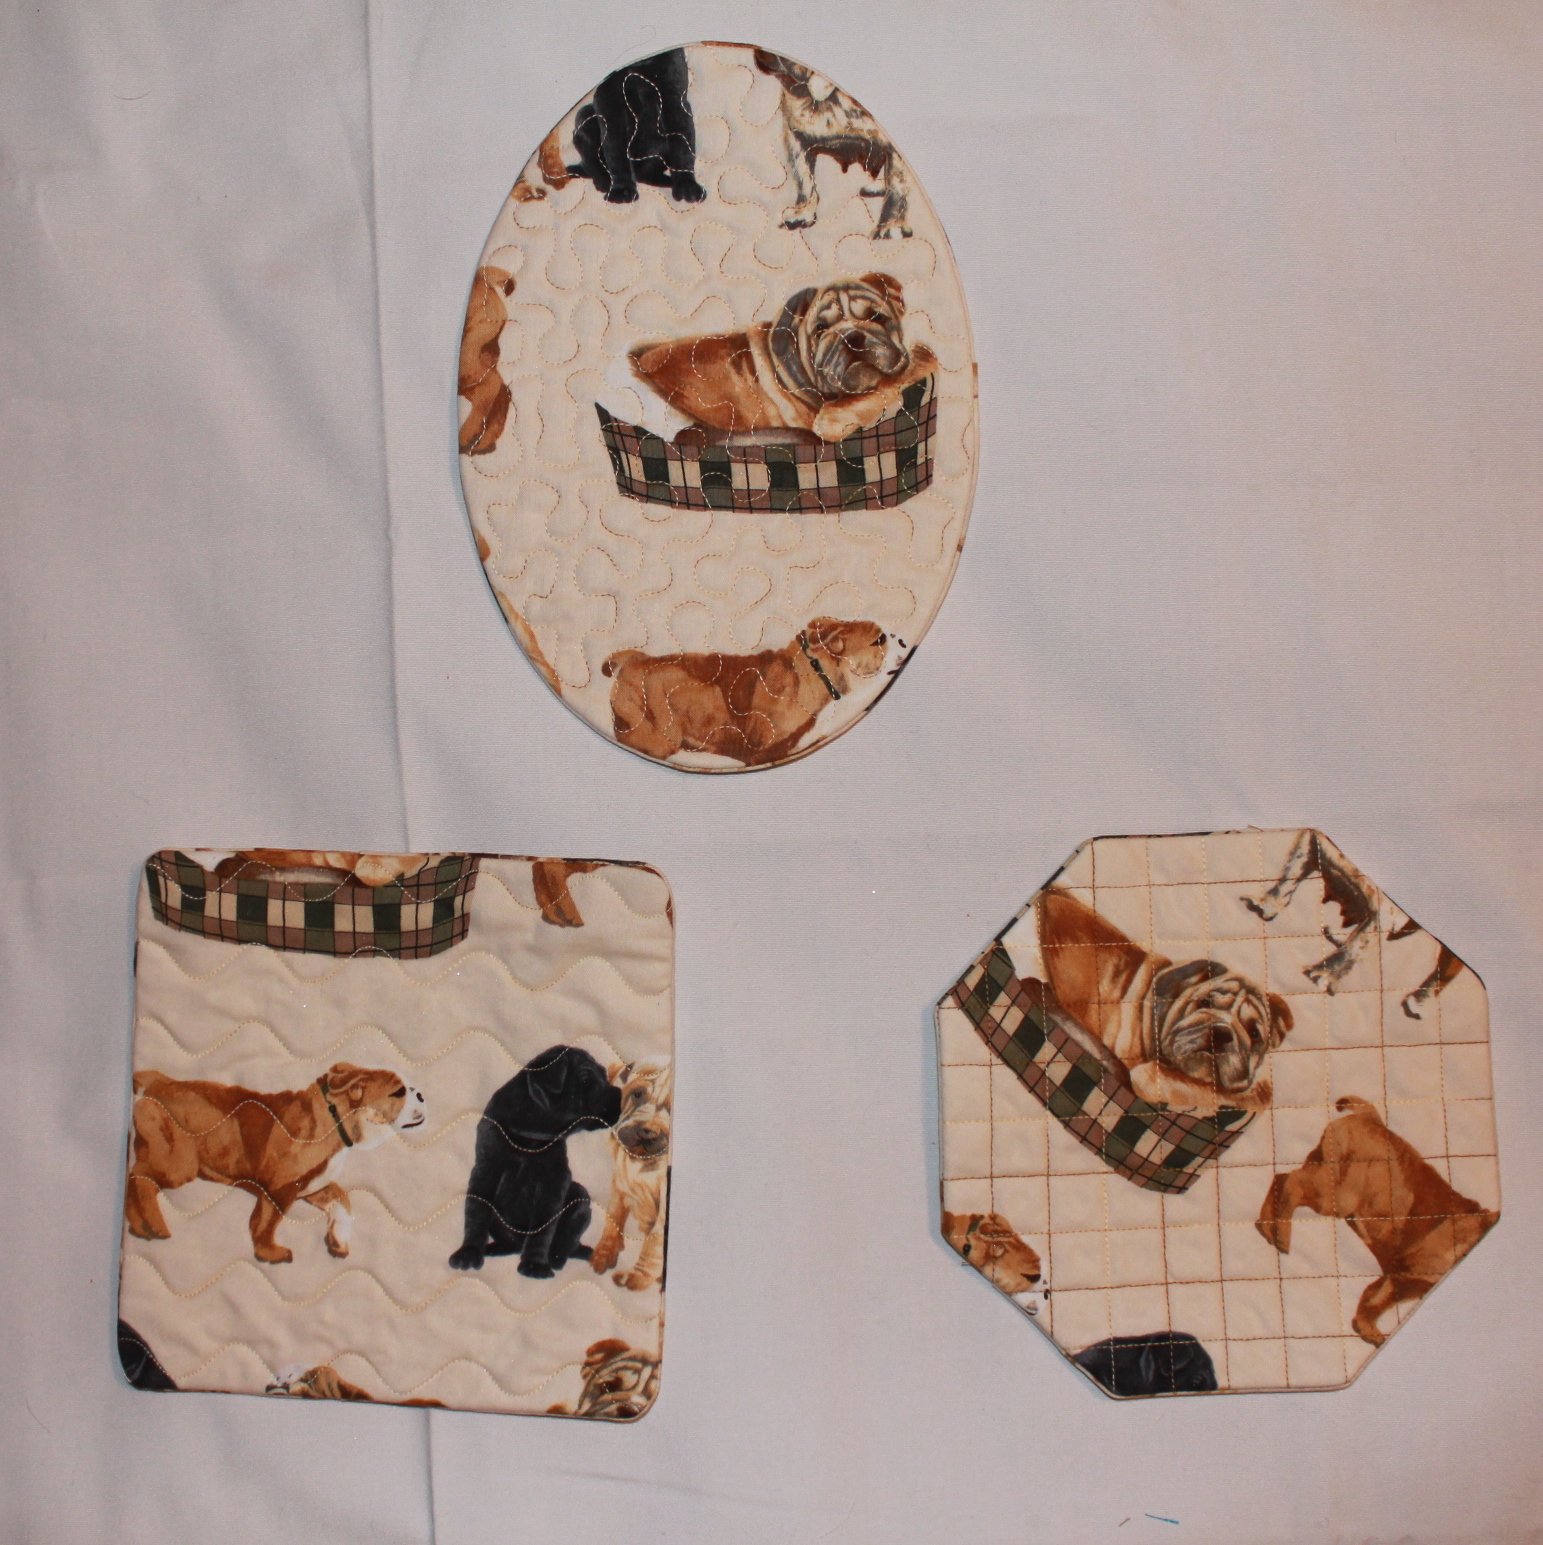
Lastly, I bought this pattern I had been dying for since the Long Beach show when I for some reason passed it up. (What was I thinking??) I hunted it down at this show and purchased is pronto!  Its by Java House Quilts and it is called Pieceful Pet Beds. Now they are probably too small for my doggies so I will make them larger. But still the perfect way to combine my love of sewing/quilting with my love of my dogs!

And what a perfect segway!  I feel like this is the perfect moment to introduce you all to my doggies!  When I make these beds...it will be for them!
This is my little Buffy being all cute and behaving herself in one of the beds in my sewing room.
Here is Princess hiding under the covers being adorable
And here is Bronco just hanging out. Sorry this picture is so bad..it came off my phone..I just love the picture!


So in closing, the Road 2 CA show was great and I hope you guys check out these new vendors and items that I just learned about. The way I learn about new things is either from shows or other blogs and internet sites so I hope to be able to pass a little of that along to you all. 

P.S. Let me know in comments what you think about Sizzix. I checked it out at the show and now it looks like it is not very fabric friendly? Is it? Is Accuquilt better?  Does anyone have either of these? I'd love to hear from you. Thanks!

Tuesday, January 18, 2011

Holiday Insanity

In this post I am going to post nearly everything I made for the holidays as gifts  for people so you can see why I disappeared for nearly a month in recovery! This post will cover everything I made that I did not already post about. if it gets too long, I may have to split into two posts. Ready?  Here goes...


 Let's start with the Professional Tote. Yes, I have made several posts about this amazing bag,  and here is another one I made for the holidays. On this one, I added additional short straps to the top to accommodate the way my mother carries her luggage through the airport. The other straps would have been too long to use and the bag would have been dragging along the floor. So I added these little straps. And then below we have the back view.


Next, we have the Serged Satchel by Indygo Junction. I made this bag using Cappucino Bali Pops and YLI's candlelight thread in the loopers. This thread is truly sparkly and gorgous! It is too thick to go through a needle so you can only use it in the loopers of your serger, for couching, and in the bobbin for bobbinwork.
 
Next, I embroidered a makeup bag with a cute hearts and rickrack design. These makeup bags come in two sizes and a ton of different colors and are great for embroidery. Plus, they are lined with vinyl to make wiping down easy for when your makeup spills all over! You can get them from The Sewphisticated Stitcher.

I also made another purse like the one you saw previously in my Quilt with your Serger tutorial. However, with this one, I shrunk the pattern by 40% (so it is 60% of its original size) and then continued to construct the bag. I also added embroidery and hot fix crystals on this smaller version. You can get the pattern for this bag here.
This next photo is of a casserole carrier I made using insulated batting so it will keep any dish cold or hot. This insulated batting is called Insul-Bright and is great for use in your hot pads, iron cases, oven mitts, etc. Keep reading for another gift where I used this batting. 
 The inside ties with ribbons so it can accommodate many different sizes of casserole dishes. 

I also embroidered many ready-to-wear shirts with various embroidery designs I knew the designated gift receiver would like. If you want to know where I got any of these embroidery designs, leave a comment or contact me and I will tell you...I'm just worried this post will get obscenely long if I go through every design I used!

 For this next one, the gift receiver goes to University of Pittsburgh and I looked on their website and they make a hoodie and shirts with Pitt just like this! So I used a Varsity font and an applique/outline stitch and re-created it for her!


And what post would be complete without something about babies???  Here are two onesies I embroidered for very special boy babies. Love those alien designs!

The next item is a two zippered makeup pouch. I also sell these on my Etsy site here. They are custom made and totally functional and can hold so much! This case is always special made up in someone's name.
Now we have another Insul-Bright gift! Here are two sets of trivets I made. These are made in the embroidery hoop, quilting in all, in one hooping! I used fabrics to match the kitchens of the receivers and instead of using regular cotton or polyester batting, I filled them with the insulated batting. This way they can be used as trivets.

Here are some coasters I made using the same in the hoop design. I just used the circular pattern and used plain cotton batting. I love this fun and colorful Chanukkah print.  I also use this same pattern, to make my monogrammed coasters that I sell on Etsy. The ones pictured there are square but I can make hexagonal, circular, square, oval, rectangular...you name it!

Making gifts for men is always hard. So I was extremely excited when I found this tutorial for a Dopp Kit. I used the basic tutorial as inspiration to make this first kit. On this one I used Decor Bond interfacing on all the main pieces. Decor Bond is what I use in nearly every handbag pattern. It is stiff, but pliable and sturdy. It is fantastic interfacing. However, I felt that it left the Dopp Kit a little too pliable--if that makes sense. In my opinion I think they needed to be stiffer. But when he got the gift, both he and his wife thought it was great that it was flexible as it would pack easier in a suitcase on trips. The choice is yours.
This next Dopp Kit I made using really stiff Peltex interfacing (the one that is fusible one one side) on only two of the four main pieces. And man this thing is stiff stiff stiff! I could hardly bend it to sew through. I think I need to find a happy medium. Any suggestions?
On this gift, I took a ready made tote bag, available at craft stores or here, and put an embroidery design on it. The receiver of this gift is in tap dance classes and this will be a great bag for her to throw her tap shoes and dancing supplies in to carry back and forth from class.
Another baby gift! These are adorable little cowboy boots I made for a baby boy and embroidered them with his name. The pattern is by Curby's Closet. Here is the pattern for the cowboy boots. They have all kinds of baby shoe patterns. Check them out here.
Last, but definitely not least, I made these little snap cases to hold things in your purse. They hold a mini tide stick, pills, anything you want. They are incredibly handy to have around. These are also made completely in the embroidery hoop in one hooping. 

Phew...I think that about takes care of it! All the other gifts I already posted about...man I just got exhausted all over again looking at all these things I made! I'm thinking about having a giveaway soon...what do you all think? What would you like to see me give away???

Tuesday, January 11, 2011

Kindle Case

During my perusal of the web, I discovered yet another awesome tutorial by the lovely ladies at Chica and Jo. Their tutorial is to make a hard cover, free standing case for your e-reader. They write the tutorial for the Amazon Kindle, but have instructions on how to fit any model e-reader. Check out their tutorial here.

(For those of you who somehow do not know about the Kindle, it is a bookstore you can hold in your hand! It satisfies all of my instant gratification desires!  When I finish a book in a series and I'm in the mood and totally dying to know what happens in the next one, I don't have to get out of my bed, drive to the store and buy the next book---I simply download it from the Kindle store in less than a minute and continue my reading pleasure!)

The tutorial is amazing and I made a super cute Kindle cover for Christmas--as you can see from my pictures. And I'm here to tell you my experiences. The Chica and Jo tutorial is complete if you are making your case out of non directional fabric and not putting any embroidery on the cover. Oops...I did both. The heart print I chose had the hearts facing one way, and I added the very simple embroidery on the front. In case you are interested, that adorable fabric I used is by Michael Miller and this particular sweetheart print can be found here. So here are a few footnotes you can add to their tutorial if you happen to run into the same bumps that I did.

First, when placing the two long lengths of fabric right sides together, you want to make sure that the print with the pocket sewn onto it is facing so the pocket is at the bottom of the print. That one is easy to figure out. Now the tricky part. When you put the other length of fabric right sides together with it, you want to place it the opposite direction, i.e. "upside down." That way when you turn the "tube" right side out and wrap around your Kindle and have it strapped closed, the front will be facing the correct way....and also when you open it up to have your Kindle available for reading, the print underneath the Kindle will also be upright. That took me a couple rip outs to do right...I kept doing it right but did not understand how it went together at the end and then by the time I did I had to go back and rip out...then it turns out I did it right the first time LOL!

Secondly, I was slightly puzzled when making my first one about where to place the embroidery. I could not figure it out until I had already sewn the bottom seam through the two lengths of fabric and pocket. After doing that part, I was able to determine where the front would be located. I turned the tube pieces so they were right sides out. Then you want to embroider on the back piece (the piece that does not have the pocket sewn to it originally) and you want to embroider on the end closest to the raw edge--the end that has not been sewn to the other length and pocket. You want to place your design starting from 8.5 inches from the raw edge--that is approximately where the top will be.

I hope this helps! I did not realize I would write a post on this when I was making it so I did not take pictures of the process of the directional print and embroidery but I hope I explained it in enough detail. If not, send me a message or leave a comment and I will make sure to clarify. Enjoy your Kindle and enjoy this free standing cover. It rocks!
Locations of Site Visitors