Pages

Showing posts with label tutorial. Show all posts

Wednesday, December 12, 2012

Dog Bed Tutorial

I went into my sewing room yesterday to start a special birthday dress project but it was so crowded and cramped I had to clean a bunch first before I could even start tracing. And while I was trying to clear out room, this fabric and pillow kept haunting me..I kept moving it from place to place and it kept getting in my way! Now I have had this retired pillow forever and the fabric I have had since around 2002! Look at how fun the pumpkins are! And its very soft and comfortable fleece! I keep saying I'm going to cover the old pillows we retire as dog pillows because it is so easy. I'm sure you can guess where this goes.....it never gets done! Finally, after moving it around the room for the 4th time I said forget it! I am getting this pillow out of this room! So I grabbed the fabric and pillow and whipped up this dog bed. It took less than 20 minutes! The only thing that really takes time is the zipper but I promise it is so easy! I took pictures so I can show you. So stop procrastinating like me and make your dog a bed!


First, place your pillow on top of your fabric and cut around it with approximately 1/2 inch extra room all the way around. 


Here is a closeup of how much extra room I left around the pillow when cutting. You can measure if you want, but since it is just meant for being on the floor, and the pillow is flexible and can fit inside even if the seams are off a little so I just eyeballed it.


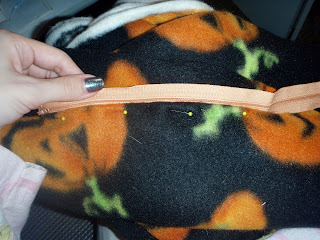
Next, take one of the long sides, right side up, and turn under your 1/2 seam allowance and pin to the zipper. The picture above shows me turning the seam allowance under and placing it against the pillow. 


While turning the seam allowance under, pin it against the zipper tape as shown above. I pin in direction I am sewing so I can pull the pins out as the presser foot approaches.


Place the zipper foot on your machine and move the needle position all the way to the right. Sew while keeping the presser foot on the right edge of the fabric.


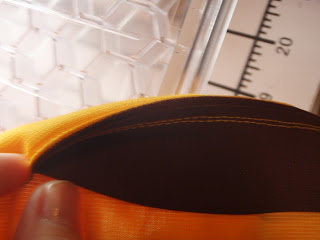
Because this is a dog bed, I wanted it to be extremely sturdy. So I did a second line of stitching over the zipper--a stress point. So I moved the needle all the way to the left this time, and ran the presser foot right the right side of the foot along the edge, same as before. Only this time, since the needle position was moved to the left, it made a second topstitching line.


Repeat for the other side. The picture above shows me turning the seam allowance under on the other piece and pinning it to the other side of the zipper tape.


Stitch along the side, this time moving the needle all the way to the left and keeping the left side of the presser foot along the edge.


I then moved the needle to the right and repeated my stitching so I could have the double top stitching to make it sturdy.


Very Important Step: Unzip the zipper 3/4 of the way. If you do not do this, you will have a hard time turning the pillow right side out when you are finished! 
Then flip the pieces right sides together so they are on top of each other with the wrong sides facing out and stitch all the way around the three sides without the zipper.


I find it easier to sew the entire seam and then cross back over with the next seam instead of pivoting at each side. This makes it sturdier and easier when turning corners. The picture above shows how I sew off the end of each seam instead of pivoting.


I also serged the seams to make it even sturdier. My four dogs are very tough on beds!!!


Here you can see it inside out after sewing. This is where I unzipped the zipper in the very important step above so that I can now reach through that opening and turn the entire thing right side out.

After turning, I zipped up the zipper and it was all done! See? Super easy!


And here is my little Buffy after I gave her her new bed! (I know I know it should be Pumpkin enjoying the pumpkin bed but she is 5 times the size of that pillow! It is just a standard sized bed pillow. She is 113 lbs and still growing right now so I will have to make a much larger bed for her.)

I hope this helps you all make your four legged family members some cozy beds! So I bet you are all still wondering, what about that birthday dress project? Well, I got started on it right after...want a sneak peek??


Any guesses on what I am making???  I'll give an extra entry into my epic birthday giveaway (when I have it soon) if anyone gets it right!!

Thursday, March 22, 2012

Coverstitch Tutorial


In my previous post, I mentioned giving you all a tutorial on the method I used for coverstitching. I only recently discovered this method and it has made such a difference!  I used to just eyeball the coverstitch and trim any excess fabric from the back. But with this method, you coverstitch on the correct spot every time and there is no trimming necessary!  The underside is perfectly covered because you stitched in exactly the right spot. So here is how:

I used the seam guide attachment for my serger but you can just as easily use a pad of post its or painters tape to mark the spot. So first you need to get one of these items. For those who are not sure what your seam guide attachment looks like, here is a picture.
Seam guide attachment with screws that attach the seam guide to the machine
After you have this, take your item with the hem already pressed or fused into place.  Then put it WRONG SIDE UP underneath the presser foot to gauge the right spacing to align your stitches to your raw edge.

see how my raw edge is aligned exactly where the two needles with the thread will hit?
Once you have it perfectly aligned, tighten the screws on your seam guide or stick your post its or painters tape exactly at the right edge of your hem.

here is the post-it pad aligned

here is the seam guide aligned and screwed down
 Now that you have your alignment exact, flip your fabric over so the RIGHT SIDE IS UP...the way you want to coverstitch. Align the right side of the hem with your mark. (Either the post-its, tape, or seam guide)
fabric flipped over and aligned with the guide
Now you can begin to coverstitch while keeping your hem aligned with your mark. The stitches will end up exactly on the edge of your hem because you already checked the alignment ahead of time!
me stitching my faux hem
Here is a picture of my finished "hem".
wrong side--see how the edges are caught perfectly? No need to go back and trim!
Front side...perfect coverstitch!

Piece of cake right?  I can't believe I was ever just eyeballing it!  This method makes it so much easier!  I hope this helps. Let me know if you have any questions...I'll be happy to clarify!

Happy Coverstitching!


Saturday, February 11, 2012

Butterick 5559 and Tutorial on Hemming

My cute Buffy had to jump in the pic


I had been seeing this dress, Butterick 5559 by Maggy London, reviewed for awhile and I had to make it. I read about the difficulties of marking and had doubts about my motivation to complete this dress because marking is my least favorite part! But I took my trusty Frixion pens and marked the right side of the fabric with the tucks. I just folded up the tissue and drew the lines.You can read my review of the Frixion pens here.


If you don't yet know about Frixion pens, they are pens that were originally developed to be erasable by friction. But as it turns out, the heat of the iron erases the marks. (They also wash out) These pens have been a huge hit in the quilting world but I haven't noticed anyone mentioning them in the garment sewing world so I thought I would make a special mention. These pens made marking the tucks so much easier than the routes others had to take and they just iron right out!  Of course I tested on a scrap before I began marking. The only thing is I had to sew all the tucks on each piece before ironing them down so the marks would not disappear...but I don't think it harmed anything. The tucks were not affected at all.
haha...look at little Wednesday's paw

Aren't they gorgeous?
I made a straight size 8 in a golden yellow ponte knit. The trim on the sleeves and the hem is a brown ponte knit. The size 8 is slightly large in the hips and I might go back and take in the side seams a little there but I'll see what you guys think first. The only alteration I made was to take in the lower edge of the armscye in an inch...and therefore made the sleeve smaller at the bottom by one inch. I felt like the golden yellow might be a little too strong all on its own (even though I love it...yellow is my favorite color!) plus my favorite shoes in the world were this color yellow leather with a leopard trim--Marc Jacobs--so I added the brown trimming. I LOVE these shoes...I have had them since early 2005. I even wore them in a torrential downpour, through  tons of puddles, and they looked ruined and the next morning?? pristine condition! That's what you get with great quality...but I digress...as this post is not about shoes!

Another reason I added the brown is because I loathe hemming! And it just made it that much easier to complete the dress. This is a method I use on knits a lot...and I believe its the method used in the new Renfrew top from Sewaholic. I am just guessing based on the ones I have seen--I don't have the pattern..but I want it! I don't know how many people use this method so I thought I would post a little about it. 

First I decided how much brown I wanted to show and ended up cutting a crosswise strip of the brown  at 2.5 inches. I cut crosswise because that was the way the stretch of the fabric went and I needed the stretch to match the hem of the garment where I had the stretch going around my body. Next I ironed the strip in half. Then I placed raw edges of the brown to raw edges (where I want to hem) of the sleeve. I did this on the sleeves before I set them in.
Raw edges together (Sorry the stitching is already there...I did not think to take pictures until it was complete

Then I stitched with a quarter inch seam all the way to the end for the sleeves. For the hem, I measured the amount that was needed and added a half inch for seam allowance and sewed the strip in a circle before placing it on the hem and sewing the quarter inch seam. The circle was not needed for the sleeves because they were still lying flat and not inserted into the garment.

Next press the seams up towards the garment. Then we are going to top stitch extremely close to the seam to hold the inner seam allowance down...and plus it gives a nice finish.  Also a little tip...use your edgestitching or blind hem foot. I am using the blind hem foot here and I set my needle almost as far as you can go to the left...two from the farthest left and ran the center of the foot (the blade) along the ditch.  Below is a picture of my machine settings which show the dot two from the left position so you can see where I had the needle positioned. Also a picture showing how to use the edgestitching or blind hem foot to do this kind of stitching.

my blind hem foot running in  the ditch


machine settings


And this is what it will look like when you are done. Two really close rows of stitching on the inside and the seam allowance on the inside is held down on the inside so it doesn't flop around.

Finished seam from the inside

And now for the big finale! I know you all are dying to see some in person shots of the dress! But first, my bragging shot. By reading all the reviews, I knew matching the tucks at the side seam would be hard...so I paid extra careful attention when matching them up and pinned in more than 5/8's so they would match. If I just pinned at the edge, they would have been out of alignment where the seam was stitched. So because I was forewarned...I ended up with side seams like this!


matched side seams!

And now for the shots on me...I kept my hair out of the way so you could see the neckline on both the front and the back...and don't miss my shoes!
back
Front


I hope this helped someone! And please ignore my giant watch in the picture...I should have taken that off...it is a nice dress after all :-) You can also check out my review of this dress here.

Friday, January 7, 2011

How to Quilt Fabric Using Your Serger

Phew!  The holidays certainly took a lot out of me. Keep watch for a post on all the goodies I made for the holidays...then you will be able to see why it took me so long to make a new post!  Sorry for being gone so long but I am back with a good tutorial. I used this technique to make a purse for my mother for the holidays. Her favorite color is deep forest green and she can never find accessories (i.e. purse and/or shoes) that are that color to match all her clothes that are forest green. Here is where I come in!  I made her a hobo style (her favorite) bag out of forest green crushed panne. And for an extra special touch, I quilted the fabric using the chain stitch from my serger! The hobo bag pattern is called Huntington Hobo and is by Pink Sand Beach Designs and is available here.  Most of you have probably never considered quilting using your serger but it truly gives a unique finish to your fabric and you get the bonus of being able to use the thicker decorative threads in the chain looper. Ready to see how this goes?

First you need to to thread your serger for a chain stitch. Not all sergers can do a chain stitch. A chain stitch requires you to use your chain looper as well as one needle. If your machine does not have a chain looper, you will not be able to do this technique. If you intend to use fun decorative threads, you want to thread them into your chain looper and use a matching color thread for the needle.

Once you have the machine threaded, you are ready to prepare your piece. I cut out my fabric pieces as well as the batting (I used fusible fleece here) so I fused the fleece to the main bag piece. However, if I were using a non fusible batting, I would simply use my 505 spray or other temporary spray to hold the pieces together while I quilted them.

Next you need to mark your piece for quilting. I chose traditional diagonal grid quilting because I knew my it would work well for my mom's taste. To do this, you want to use your regular rotary cutting ruler and the 45 degree line on it.
As you can see from the picture, you want to line up your 45 degree mark on your ruler along a straight line..the bottom of this curved purse piece was the straightest so I lined up the 45 degree line along there. Then I traced with a extra fine point sharpie (it wouldn't show because the bag would be lined) along the edge of the ruler. Then I decided I did not want to spend a ridiculous amount of time quilting by making a tiny 1 inch grid so I decided to make things easy and space the lines exactly the width of my ruler...no measuring needed! It was an easy shortcut.
 So I continued to trace along using the width of my ruler as the guide and did both the left diagonal and right diagonal lines.
Now I was ready to take it to the serger. The fun thing about chain stitch quilting is that the decorative stitch shows up underneath...so you want to stitch with the wrong side (the side you just traced all your lines onto) up. Then you just feed the fabric through the serger along each line following the lines under the needle. Continue until you have done every line.


That was easy right??  You are all done! Now you can continue to finish your pattern with your own uniquely made fabric. I am posting some close ups below but it is truly hard to see the fun chain stitch even in the close ups...but I promise you, it looks much cooler than traditional straight stitching.

When I was finished with the purse, I added a dark green hot fix rhinestone to each intersection to add one more special touch. I applied them with the hot fix rhinestone applicator---soooo much easier than trying to use your iron to place these little guys!

I also added her initials using my embroidery machine and iridescent white thread from sulky--my favorite! It's color 7021 and is available here at an amazing price! However, because it is white and I was doing this embroidery on dark fabric, I used an underlayer to keep the fabric from showing through. This is my new discovery and it is fantastic! I no longer need to do multiple layers or increase the density to keep light colors--especially white--from having the fabric color show though.  It is called Hide It Stabilizer and you simply choose your color to match your thread, and place a piece down underneath where your embroidery will be. It is best to tape down the edges so they do not get caught under the foot. Then embroider your design and then simple tear it away---it rips cleanly from the edges which have been perforated by the stitches! It is simply genius!

Well I hope I've given you all a new idea to think about when making your items. Leave a comment or post a picture if you use this technique to make anything. I would love to see it!!

Wednesday, November 24, 2010

Toddler Purse Tutorial

My good friend has the two cutest babies that I love making stuff for. The older one is turning 2 next week so I just had to make her a cute toddler sized purse to carry around the play makeup and hair items I got her.  I did not find any commercial patterns or tutorials I liked on making a bag for a toddler so I figured I would make my own. Now, if I was searching for this type of pattern and tutorial I figured there has to be others…why not turn what I make into a tutorial! So bear with me as this is my first tutorial and there were some parts where I forgot to take photos but I really think you can follow along with what I have. If you can't, feel free to ask and I will tell you!

First I laid out all the items I wanted to fit in the bag.


Then I drew a basic size shape on a plain piece of paper that would hold all those items.


This gave me the basic idea for my measurements since I wanted to piece the exterior of the purse together. You can use this size shape as your basic pattern for cutting your pieces into a square out of one whole fabric piece (adding an extra ½ inch for seam allowances),  or use it to decide how large your separate pieces should be to make the exterior the size of your pattern/drawn shape. The supplies listed below are if you want to piece the outside with multiple fabrics such as I did.


Supplies:


- 2 strips 1.75 x 9 for the top strip (pink)

- 2 strips 1.5 x 9 for the middle strip (purple)

- 2 strips 3.5 x 9 for the bottom strip (pink)

- 2 strips 2 x 16 for the straps (purple) -- to determine this measurement, I laid the tape measure out in a rounded shape above my drawn pattern piece to get an approximate measurement, then added an extra inch for seam allowances

- 2 rectangles of lining fabric (mutli colored hearts) cut the same size (or 1/8 inch smaller all around) as the pieced exterior (this means that after sewing the pink and purple strips together, you can put this rectangle on top of the lining fabric and cut around it the same size for the linings as well as the fusible fleece for the lining—I talk about this more after the exterior is pieced and we begin on the lining)

- 2 small squares of pocket fabric (purple) cut to the size of the pocket you want (I placed the item I wanted to be used in the pocket—the phone—on top of the fabric to determine the correct size to make the pocket…see picture below)

- 1 strip of fusible fleece 2 x 16 fused to wrong side of one fabric strap

- 2 rectangles of fusible fleece, same size as lining rectangles, fused to the wrong side of each lining rectangle

- 2 scraps of Velcro (I used small squares—I worried about the potential of zipping up a finger if I used a zipper closure—especially with the younger baby around)

- 1 15 inch length of ribbon to tie into a bow to embellish the outside


Here is a picture of my supplies (after I had pieced the exterior):


First you want to place your three strips for the exterior out in the order you want them. Then place right sides together of the top and middle fabrics and sew a ¼ inch seam. Then place that piece right sides together with the bottom strip and seam. Do the same for the other exterior piece. When you press the seams you have sewn, you want to make sure to press one set of seams towards the top fabric (up) and the seams on the other exterior piece should be pressed down. This will help when matching the seams later when sewing the pieces together.


If you look closely, you can see how each piece has seams that are pressed in opposite directions.


Now that you have both exteriors pieced, you can use these to measure out the size to cut the lining pieces and the fusible fleece for the lining. You can cut those now and also fuse the fleece to the back sides of both pieces.


Next, take your pocket pieces and place them right sides together and sew around the edges with a ¼ inch seam leaving an opening to turn the pocket to the right side.


Turn the pocket right side out and push out the corners and seams and press well.

Now pin the pressed pocket on top of a lining rectangle where you would like the pocket to be. (I placed mine towards the right). Sew all the way around the pocket at the very edge (topstitch) with a thread that matches the pocket fabric. 

Next place the rough piece(s) of Velcro on the lining where you would like it to be and stitch it down to the lining. Place the opposite lining piece on top of the piece with the Velcro and pocket and mark where the Velcro meets the lining piece. Now sew the soft Velcro piece to the spot you marked on the plain lining piece.
These are the steps where I forgot to take pictures! I took a picture of this that I will post here but it was after I sewed the lining pieces together so only look at the picture for placement purposes and know that the steps to sew the lining together are coming up soon!


Now you can also see not to make the same mistake I did and make your pocket as big as the purse is going to be! Keep that in mind when cutting your pocket pieces. I used a piece of Velcro on each side of the purse opening but you can just as easily use a larger piece in the center. It is up to you!

Back to the exterior pieces. Place the exterior pieces right sides together making sure to line up the seams. Remember how we pressed in opposite directions? This should enable you to butt the seams up to each other and pin them in preparation for sewing. We will be sewing down one side, across the bottom, and up the other side leaving the top open. Do not forget to backstitch at the beginning and end to lock those stitches!

It is hard to see in the picture above but I tried to take a picture of how I butted the seams together and pinned them before sewing. Now that the pieces are sewn together, we are going to square the bottom of the bag to give it some shape.

To do this, I match the side seam to the bottom seam where the sides end up folding out into a triangle at the bottom. It's hard to explain but do not worry I have tons of pictures of this part!

I have placed a pin there because I used my fingers to feel and make sure that the two seams matched up together and placed a pin so they would not move. Next I marked in 1 inch from the point with a line.


I drew a line and repeated this process for the other side. Then I took it to the sewing machine and stitched both sides on the marked line that I drew.  Then I trimmed the excess to make the seam about 1/4 inch.

After you have the exterior done, you want to do the same process for the lining of sewing the pieces together and squaring the bottom--with one major difference!  We need to leave an opening in the bottom of the lining. So when you first place your lining pieces right sides together to sew down the sides, across the bottom, and up the other side, you need to not sew the entire bottom together--leave an opening for turning like we did with the pocket. This picture will show you the opening I left.


You want to make yours more in the center. I made mine off center and then by the time I squared off the bottoms, it was too far over to make things easy. Make sure your opening is in the center to make things easy on yourself. 
Now place both the lining and the exterior aside because it is time to sew the straps. One strap should have fusible fleece fused to it. Place the straps right sides together and sew on each side with a 1/4 inch seam leaving the short ends open, essentially making a tube. Turn the tube right side out and press. Now your straps are done.

Almost done! Now we are going to put all the pieces together.   Make sure the lining is turned wrong side out so that the fleece sides are facing you, then place the long strap with one end on the inside of the lining (the fabric side) and pin making sure approximately 1/2 inch is above the lining and pin the other side of the strap to the other side leaving the same 1/2 inch above the lining. This means that the strap will be lying down inside on the bottom of the lining! I know it seems backwards but trust me. Next you want to take the exterior of the bag and make sure it is wrong side out as well so that you are placing the patterned fabric side down into the lining. This means that both pretty sides of the fabrics are facing each other. (right sides together!)  You can see this layering in the picture below. Note the straps poking out from the sides--the strap is lying down inside between the two layers! It is not pinned and hanging out the top. Make sure to match the side seams of the lining and the exterior together and pin around the outside as shown.


Sew around the top with a 1/4 inch seam.  Now turn the entire bag right side out through the hole we left in the bottom of the lining, like so.

When it is completely turned right side out it will look like this.
Now take this time to either stitch the opening in the lining by hand or by machine. I sewed mine by machine and here is a close up that also shows I sewed it a little crooked....oops. But I bet the birthday girl doesn't say one word about it!
Now tuck that lining into the purse and squish and pull the edges and straps right until it fits perfectly. Tada!
Wow the purse is basically finished. You can now add the bow on the outside or embellish however you want. Although, if you wanted to add embroidery, you should have done it way back after you pieced the exterior. Last step I did---I added the goodies!


She is ready to go!  All that play makeup looks like so much fun. Did I mention I met her mother when we both worked at makeup counters at a department store?  It's impossible to get started on makeup too early! So I hope you enjoyed my tutorial..I know it is pretty detailed but I was trying to write it for the extreme novice sewer. Please send me pics or post comments about the bags you make. I love seeing them!! Enjoy!!!
Locations of Site Visitors