I went into my sewing room yesterday to start a special birthday dress project but it was so crowded and cramped I had to clean a bunch first before I could even start tracing. And while I was trying to clear out room, this fabric and pillow kept haunting me..I kept moving it from place to place and it kept getting in my way! Now I have had this retired pillow forever and the fabric I have had since around 2002! Look at how fun the pumpkins are! And its very soft and comfortable fleece! I keep saying I'm going to cover the old pillows we retire as dog pillows because it is so easy. I'm sure you can guess where this goes.....it never gets done! Finally, after moving it around the room for the 4th time I said forget it! I am getting this pillow out of this room! So I grabbed the fabric and pillow and whipped up this dog bed. It took less than 20 minutes! The only thing that really takes time is the zipper but I promise it is so easy! I took pictures so I can show you. So stop procrastinating like me and make your dog a bed!
First, place your pillow on top of your fabric and cut around it with approximately 1/2 inch extra room all the way around.
Here is a closeup of how much extra room I left around the pillow when cutting. You can measure if you want, but since it is just meant for being on the floor, and the pillow is flexible and can fit inside even if the seams are off a little so I just eyeballed it.
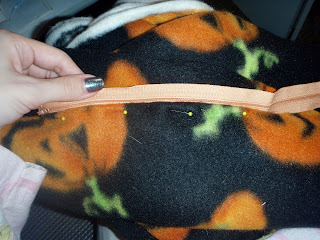
Next, take one of the long sides, right side up, and turn under your 1/2 seam allowance and pin to the zipper. The picture above shows me turning the seam allowance under and placing it against the pillow.
While turning the seam allowance under, pin it against the zipper tape as shown above. I pin in direction I am sewing so I can pull the pins out as the presser foot approaches.
Place the zipper foot on your machine and move the needle position all the way to the right. Sew while keeping the presser foot on the right edge of the fabric.
Because this is a dog bed, I wanted it to be extremely sturdy. So I did a second line of stitching over the zipper--a stress point. So I moved the needle all the way to the left this time, and ran the presser foot right the right side of the foot along the edge, same as before. Only this time, since the needle position was moved to the left, it made a second topstitching line.
Repeat for the other side. The picture above shows me turning the seam allowance under on the other piece and pinning it to the other side of the zipper tape.
Stitch along the side, this time moving the needle all the way to the left and keeping the left side of the presser foot along the edge.
I then moved the needle to the right and repeated my stitching so I could have the double top stitching to make it sturdy.
Very Important Step: Unzip the zipper 3/4 of the way. If you do not do this, you will have a hard time turning the pillow right side out when you are finished!
Then flip the pieces right sides together so they are on top of each other with the wrong sides facing out and stitch all the way around the three sides without the zipper.
I find it easier to sew the entire seam and then cross back over with the next seam instead of pivoting at each side. This makes it sturdier and easier when turning corners. The picture above shows how I sew off the end of each seam instead of pivoting.
I also serged the seams to make it even sturdier. My four dogs are very tough on beds!!!
Here you can see it inside out after sewing. This is where I unzipped the zipper in the very important step above so that I can now reach through that opening and turn the entire thing right side out.
After turning, I zipped up the zipper and it was all done! See? Super easy!
And here is my little Buffy after I gave her her new bed! (I know I know it should be Pumpkin enjoying the pumpkin bed but she is 5 times the size of that pillow! It is just a standard sized bed pillow. She is 113 lbs and still growing right now so I will have to make a much larger bed for her.)
I hope this helps you all make your four legged family members some cozy beds! So I bet you are all still wondering, what about that birthday dress project? Well, I got started on it right after...want a sneak peek??
Any guesses on what I am making??? I'll give an extra entry into my epic birthday giveaway (when I have it soon) if anyone gets it right!!


Your dogs are so cute. Thanks for the great idea. I will make one for my bulldog.
ReplyDeleteAwww...I want to see! Send me a pic!
DeleteThat's cute and when you buy new pillows for the human beds, take an old one and stuff it into the dog bed, and then throw that one away. It keeps the stink down!
ReplyDeleteThat will work perfectly! Especially since I seem to go through pillows very quickly....
Delete