Pages

Thursday, March 22, 2012

Coverstitch Tutorial


In my previous post, I mentioned giving you all a tutorial on the method I used for coverstitching. I only recently discovered this method and it has made such a difference!  I used to just eyeball the coverstitch and trim any excess fabric from the back. But with this method, you coverstitch on the correct spot every time and there is no trimming necessary!  The underside is perfectly covered because you stitched in exactly the right spot. So here is how:

I used the seam guide attachment for my serger but you can just as easily use a pad of post its or painters tape to mark the spot. So first you need to get one of these items. For those who are not sure what your seam guide attachment looks like, here is a picture.
Seam guide attachment with screws that attach the seam guide to the machine
After you have this, take your item with the hem already pressed or fused into place.  Then put it WRONG SIDE UP underneath the presser foot to gauge the right spacing to align your stitches to your raw edge.

see how my raw edge is aligned exactly where the two needles with the thread will hit?
Once you have it perfectly aligned, tighten the screws on your seam guide or stick your post its or painters tape exactly at the right edge of your hem.

here is the post-it pad aligned

here is the seam guide aligned and screwed down
 Now that you have your alignment exact, flip your fabric over so the RIGHT SIDE IS UP...the way you want to coverstitch. Align the right side of the hem with your mark. (Either the post-its, tape, or seam guide)
fabric flipped over and aligned with the guide
Now you can begin to coverstitch while keeping your hem aligned with your mark. The stitches will end up exactly on the edge of your hem because you already checked the alignment ahead of time!
me stitching my faux hem
Here is a picture of my finished "hem".
wrong side--see how the edges are caught perfectly? No need to go back and trim!
Front side...perfect coverstitch!

Piece of cake right?  I can't believe I was ever just eyeballing it!  This method makes it so much easier!  I hope this helps. Let me know if you have any questions...I'll be happy to clarify!

Happy Coverstitching!


Tuesday, March 20, 2012

Giorgio's Top

Part of the new Spring line from Silhouette patterns included this top, called Giorgio's Top. For those of you who are not familiar, Peggy Sagers (designer of Silhouette patterns) makes no secret of how there are no copyrights in fashion and she picks clothing items she likes from designer lines and remakes them as patterns for her line. (Check out her trench pattern---its the Burberry design!) This top is one from the runway of Giorgio Armani--hence the name Giorgio's top. It is essentially a basic princess seamed t-shirt with a cute flared peplum at the bottom.

I made the smallest size, size 1, and it is slightly big. I also made it completely on my serger. I just lined up all the pieces and serged down the seam. Next time I might take slightly deeper seam allowances...but it is probably only big because I used a slinky knit. I used this sparkle pumpkin slinky knit from fabric.com. I bet it will fit perfectly when I use a regular knit next time. Also, I am long waisted and love my shirts long...but even this one is a little too long. I may take off 1/2 of an inch next time. I also think my slinky knit was a little heavy (huh? normally they are so light!) to convey the peplum to the extent on the pattern picture. I will use a real lightweight knit next time as I love that feature. So hmm...maybe it wont pull down as long in a lighter weight knit so maybe I should not cut off any length until I see how low it pulls.

Per the instructions, I just folded under the sleeves and neck hem and top stitched using the coverstitch on my serger. For the hem, I used this 1 inch knit tape from Emma Seabrooke, and put it fusible side UP (away from wrong side of fabric), on the inside of the hem, and serged all around. Then I folded up that 1 inch hem, and fused it in place. Next I took it to my serger and cover stitched. (Please note that this tape does come in double sided fusible, I just happened to have this one sided in my stash already) I like the feel of hems on knits with this tape because it gives them a little body and keeps them from rolling in light weight knits.
back view
side view


Close up of front--that weird pucker is the shirt going over the button on my jeans

Stay tuned for my next post which will be a tutorial on the great method I used to coverstitch the hems. It makes everything line up perfectly on the back! No trimming required.

You can see my review of Giorgio's Top here.

Monday, March 12, 2012

A Trip Downtown to LA's Garment District

A couple posts ago I wrote about the outfit I wore to the Sew LA Colette Patterns book signing party. What I failed to mention was that I had spoken with a fellow sewer on patternreview about meeting up there. Of course, due to our complete and utter lack of planning, we completely missed each other. :( But don't be sad! The story gets fantastic!

This fellow PR member, Nhi, ended up meeting two other lovely ladies at the party and they made plans to go to the garment district and shop up a storm. Nhi, being the thoughtful person that she is, decided to invite me along even though I had never met any of them! I was so excited and touched!

We all met up this last Saturday and shopped until we dropped. Dropped literally. I was so exhausted. We went from 9:30 am meet up at the Loft of Michael Levine and left around 4 or 4:30. And we scored big time! If you are willing to scavenge and almost turn the boxes upside down, you can find some good stuff in there. And it is only $2.50 per pound!! POUND! I will show you my haul in another post because it is currently in the washing machine.


Now of course I had never met any of these girls before but was that an issue? Not in the slightest! We spent all day laughing and talking. I had a blast. Nhi introduced me to Sandra, and fellow blogger Jill. (from whom I stole our picture below...she has made some really adorable items on her blog...go check it out!) We all were also wearing something we made. These are some talented ladies! I cannot wait to see what they make with the fabrics they got! 
From left to right: Jill, me, Sandra, and Nhi (You are seeing a sneak peak of my Renfrew shirt!)

We went all over the district and I definitely found many much wanted needed pieces of fabrics. But of course, since I am on a mission to find hot pink and black houndstooth medium weight woven fabric, for my Galaxy dress, Vogue 8280, it was nowhere to be found. Any readers have any clue or happen to have some by them? I NEED it! I want to make the dress to wear to my sister in laws wedding in May.

This day sounds pretty exciting huh? But wait! There is more! I met mimi g!  You all know mimi g right? Of sewing and blogging fame? I recognized her at the cutting counter at Michael Levine's and I think creeped her out just a little by running up to her and calling her by her name. Yes...I now realize that is creepy. Oops. But it all worked out and she was super nice. I told her what a fan I was of her blog.

Side note! She mentioned me in her blog. And even remembered my name! Is that not the sweetest thing you have ever heard? I am so touched. I was nervous of going up to her originally but the girls convinced me and now I am so glad I did. She was the nicest...and of course extremely fashionable...as I am sure you can tell by her blog. I am here to tell you that yup...she lives up to the hype. Just as gorgeous in person!

Thursday, March 8, 2012

Red Dress Contest

A few weeks ago, I published about my entry into my first Patternreview contest...the Red Dress Contest. Voting has now begun. If you like my entry, please vote for it here. My username on Patternreview is Spaiyq. My entry was this great Colette Patterns Peony I made out of fun, yet classy, Halloween themed fabric.

There are a ton of cute dresses entered in the contest so make sure to check out the other entries too! Thanks for voting!

P.S. In case you are wondering, as a little side note, what the hell Spaiyq is, I will tell you. Remember Buffy the Vampire Slayer the TV show? (best show ever?) and remember the impossibly dreamy Spike?  Well in season 2, episode 3, School Hard, he first introduces himself to us and says his name. Now Spike in the show has a British accent. So he says Spike with a British accent when he tells us his name. And Spaiyq is my attempt to spell it phonetically the way he says it when introducing himself. Makes perfect sense right????  (Lol..keep in mind I started using this name 15 years ago.)

This is the screenshot right after he tells us his name.....remember those good times readers?

Wednesday, March 7, 2012

Vogue 1178

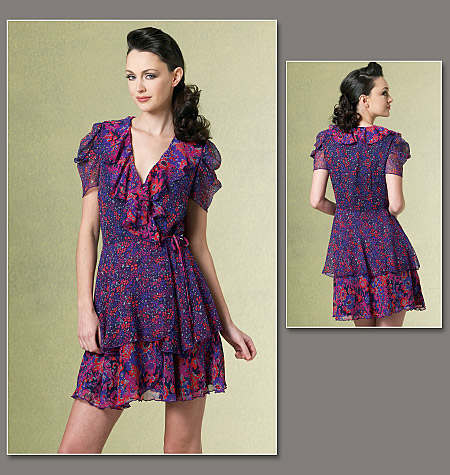
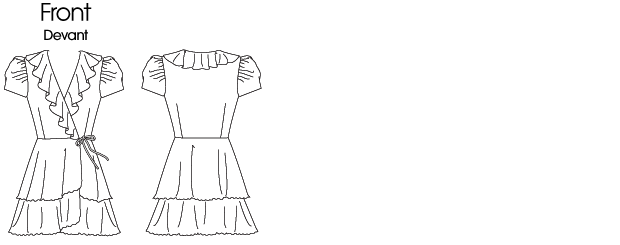
I made this dress about 1 year ago to wear to a good friends wedding. This dress was almost never made! I saw this pattern, Vogue 1178, when it first came out and completely passed over it. The picture of the model and the dress does not appeal to me at all. But later on I saw the line drawing and realized what an adorable dress it was! Plus it doesn't hurt that it is an Anna Sui design...she designs amazing clothes!
I immediately bought some Amity style fabric... (Halloween colors see?) and got to work. I used polyester chiffon for the top layer and the ruffle layer. The polka dot one I got on ebay and the black chiffon has black sequin type things...more like large sparkly dots periodically and I got that at Joann's. I also used my favorite polyester lining...it does not feel silky it feels more like a georgette. I love the feel of this kind of lining vs the slippery satiny feel of linings for jackets and things. I think each type of lining has its place. I like this polyester/georgette feeling kind for directly against my skin. 

This pattern was rated average and I believe it was done so because of the tricky type of fabric you are supposed to use and the miles and miles of teeny tiny little hems. Um...no. I was not about to do that. I used my serger for the majority of the construction. I did rolled hems on everything I could. I used this gorgeous serger thread from Superior Threads called Halo.  The two colors I used were Snowfall and Jet Black Silver.
With this method, construction was easy. There is one thing to note though. I guess I never noticed the weirdness of the sleeves in the picture. When I made up the sleeves and tried them on, I thought at first I had done something wrong because they looked so odd! But a careful glance at the cover photo shows that the dress has those weirdly poofy and tucked sleeves. So I went with it. A lot of the reviewers were in love with the sleeves...if I made this again I would probably just used a traditional gathered sleeve instead of doing all the tucks that gave it kind of a weird shape when it was on.  One other change I would make is to the front wrap piece. If you look above at the line drawing, you can see how the edge is rounded at the bottom of the piece that wraps over the top. It lays unevenly on me and I would square that off if I made it again so it would lay flat instead of pulling to the left slightly. All in all, the pattern was much easier than I would have anticipated.
close up of weird sleeves.....isn't my husband the most handsome man ever???  <3

As far as fitting goes, I had to take in the bodice 1 1/4 inches on each side. And as a result I took some tiny tucks in the skirt to make it fit the new bodice size. That was the only change I made. There was no gapping problems or anything else. Pretty lucky huh?  I used silk thread for the construction but in hindsight, it made it made it more difficult to sew and more puckers were occurring. Half way through I grabbed Sandra Betzina's More Fabric Savvy and learned I should be using polyester thread to sew chiffon to avoid puckers. Oops....so keep that in mind readers!

Here is an in person shots....sorry about the weird angle.  It is one of the few full length pictures I have from that wedding.
 
Me and my adorable husband

You can see my review here on Patternreview.com.

Locations of Site Visitors