Pages

Showing posts with label embroidery. Show all posts

Wednesday, December 5, 2012

Halloween Wedding Wednesday-Table Names and Signs


For our wedding, we decided to use the names of movies that all depicted a different part of Halloween for each of our tables. We had vampires, zombies, slashers, ghosts, witches, graveyards, etc to catch every aspect of the Halloween mood. Now that presented a very unique problem...there was no centerpiece that was going to work for every table. So guess what we did? We did different themed centerpieces for each table! They looked incredible...but that is for another post. This post is about the unique signs I digitized, compiled, and embroidered to designate each table. I was not intending on naming each and every design I mashed together and compiled to make each sign, but if you are interested, it is definitely something I can do.

I did all the signs on black broadcloth (which made color choices much trickier because you obviously want to use a lot of black in Halloween decor and I couldn't use black thread on the fabric!) which we wrapped around a stiff background. The best part about embroidering these several hours long each designs with multiple thread color changes? Getting to do it twice!!! Your table signs need to be double sided. Man was I in a time crunch doing these into the wee hours of the night on the final days.

We had ten tables of ten plus the the one sweetheart table. Also each table had a color theme which I will tell you here and you will see why in a future post.... (I had to lighten each photo so you could see the details and some of them look crooked because they were taken from their stand and placed against the railing of the ship to take the pictures...they didn't all quite stand perfectly..but when they were in the holders on the table they were square)

Ready?

Amityville Horror: This was our sweetheart table that only my husband and I sat at. And of course it was fitting since my name is Amity and it's a classic horror film! I used an outline haunted house and then digitized the big looming eyes in the background. The font I used was Lycanthrope and I used Font Engine in Embird to digitize it. The color theme for this table was yellow..neon yellow in fact! This is because yellow is my favorite color.


Dracula: What Halloween themed wedding would be complete without vampires? Especially since vampires are one of my favorite parts of Halloween! The color for this table is....RED! Obviously right? I did the Dracula writing in Blood of Dracula font which was used in our save the date and invitations and the rest of the design was done in gold metallic thread. (I have ways of making metallic thread work perfectly for me...especially since i used it so much for my wedding...if you want to hear what I do and some tips, let me know)


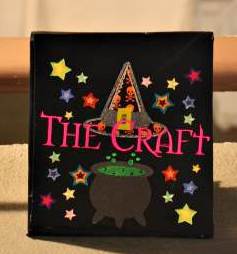
The Craft: This movie came out when I was in 8th grade and I loved it. It is such a great movie for my generation. This table and movie represents witches! A classic part of Halloween. The color for this table was pink. For this sign, I digitized the font using the same font that they used for the movie posters. It took a log time to find this font and had to use a font search engine that allows you to upload pictures of the font and then searches for the same font. I had the most difficult time finding this font. I also used a giant cauldron and some pretty stars to jazz it up. Let me tell you...all those thread changes with the stars was not fun! What was I thinking??? But it looked so good...I think it was my favorite sign of all of them.


The Nightmare Before Christmas: This tables color was orange! This seemed perfectly fitting since Jack Skellington is the Pumpkin King! For the sign, I used the same font as the Nightmare Before Christmas movie and download this great Jack design off Etsy. Trying to do Jack without using black thread was definitely a challenge!


Frankenstein: another classic! This tables color was green....of course. The font I used for the name is the Frankenstein font. I also found various Frankenstein designs to use on the sign and a cool mad scientist laboratory type border and beakers.


Army of Darkness: Those of you who know this movie know that it is fantastic! And totally needed at a Halloween wedding...and those of you who don't know this movie? Its a cult classic campy comedy horror film. If you watch it while realizing that...its fantastic. If you have no idea what you are getting into, you might think it is completely bizarre! In any case, the color for this table was blue. I used the true Army of Darkness font from the movie. I also found a book design and deleted what was on the cover and put a skull there. This was crucial because the Necronomicon (Book of the Dead) is a crucial part of the movie. I also put the classic key words Klatu verata nikto around and added the dead skeleton rising to complete the sign.

Addams Family (Values): My favorite movie of all time!! Do you know this movie? It has the most hysterical jokes and dry humor that is easily missed. Also, one of my dogs is named after Wednesday from those movies/tv shows. When I named my dog Wednesday, I thought that would be obvious. But so many people ask if it is because I got her on a Wednesday or ask why i named her that. Apparently I am getting old!! (not really...I'm only turning 30 this month...watch this space for a major birthday giveaway!The younger people don't know of the Addams family! How tragic...they are wonderful  Moving on...the color for this table is purple. I used the true Addams family font from the movie for the table name. Then I used a gothic victorian collage of designs on the sign. I think it turned out gorgeous. I need to us that design on some pillows or something for the home.


Casper: did you think i would forget ghosts??? Of course not! Growing up, I loved Casper! And I was constantly told that I looked like the girl from Casper- Christina Ricci. And Devon Sawa at that age? Ladies of my generation...am i right? Dreamy... Guess the color of this table....did you guess white? Correct!! I used the same font as the movie for Casper and found some great ghost designs. If you look closely, one of the ghosts are shopping and wearing jewelry! How appropriate!


House of 1000 Corpses: Not all of you might be familiar with this movie, but it was written and directed by Rob Zombie of White Zombie and later Rob Zombie fame...great music! This movie took several years to get pushed through...it was too graphic, was going to get an NC-17 rating------ that and it finally made it into theaters years after it was made! There was a sequel made right after this one was released, the sequel is called The Devils Rejects and all the characters look so much older! This is because the first was filmed so long before it ever came out. Also as a side note, Rob Zombies very pretty wife also stars these movies. Ok enough of the movie. I did the font in a skull alphabet font, found various tombstones and placed them all over the sign to make it look like a graveyard with 1000's of corpses...hahaha I'm so funny. The color of this table was silver.


Pirates of the Caribbean: This tables sign was my second favorite. I spent so much time digitizing and then embroidering this one. And making the jewels by using hot fix crystals....ahhh so pretty! The color for this table was gold. I used the same font as from the movie. I used a pirate ship, some crossed swords as a border, and a treasure map and telescope. The little dots you can see above the swords on the bottom right of the ship are the hot fix pirates booty (jewels) I put there.


Scream: Another classic for my generation! Great slasher flick! The first couple of these movies came out when I was in high school and were instant hits. I love these movies! So it was natural for me to have a table for Scream. The color for this table was black. I first found a great grim reaper that I used for the sign. And then I digitized some scream mask faces to us on the edges. For the font I used the exact same font they used for the movie. I did the font in a metallic black thread and then used red hot fix crystals to outline the letters inside.


So what do you think? Are you excited to see what the decorations/centerpieces on each table looked like?

Monday, February 6, 2012

Magna Hoop vs. Snap Hoop

I own both the Magna Hoop and the Snap Hoop. Because my embroidery machine is a Babylock Ellisimo, I was able to get the snap hoop as soon as it came out. I have now used both of them enough times and tried them on a significant variety of projects that I now feel comfortable reviewing them for you all.

My personal preference of the two is the Magna Hoop. Now I can hear all of you screaming your love for the Snap Hoop---the Snap Hoop is great also!  They both work for very different things....it just turns out that the type of embroidery I tend to do more often works great with the Magna Hoop.

So, first things first. Magna Hoop is NOT A HOOP! I think that is the biggest misconception. Magna Hoop only works with the hoops you already own for your machine. Magna Hoop is simply inserts for your hoops. This works well if you are often embroidering on oddly shaped items such as clothing pieces or quilt blocks, purse pieces, towels, etc. It holds the fabric down in the hoop in every area but where you are embroidering. So this gives it more stability than say, just using a sticky stabilizer.
Example of the 5 x 7 Magna Hoop-the other sizes come with different shaped inserts
Here is also a link to a video Eileen Roche (the inventor of both hoops and editor of Designs in Machine Magazine) did on describing the Magna Hoop. I also want to include a link to her blog where she writes about the comparisons between Magna Hoop and Snap Hoop and when and she uses each one and why. That post can be found on her blog here.

Now the Snap Hoop is an actual hoop.


This hoop makes squaring up fabric and getting rid of puckers easier. This is because the top of the hoop is magnetic and does not latch in like normal embroidery hoops. Therefore the fabric can be slid around underneath it until it is square and has no wrinkles. This cannot be done in a regular hoop because of the tightness of its grip and the probability that it will cause puckers if you pull after hooping. Here is a link to Eileen Roche's video on the Snap Hoop.

Now the reason I prefer the Magna Hoop is simply because of the type of embroidery I tend to do. I do a lot of onesies so I bought the 4 x 4 hoop to make hooping square easier. Problem is, it does not hold tight enough for the small 6-9 month onesies I embroider. These are TINY! So I have to pull the fabric all around the hoop and stretch and hold it so the presser foot doesnn't catch it while it is embroidering. With all this pressure, the snap hoop magnets tend to slide whereas the normal embroidery hoop holds everything tight. So the Snap Hoop simply does not work for me for this purpose.


Additionally, the Snap Hoop is not good for applique...which I also do a lot of! You do not want to have a ton of stitches on baby items so applique designs are better than fill stitch designs for baby clothes. The instructions that come with the Snap Hoop even caution about using it for applique because of the potential for the fabric to slip around with the constant removing of the hoop from the machine and manipulation to cut around stitches for applique. However, Eileen Roche has found a solution for this problem. If any of you have any of her Stipple collections, you can see in the videos she does them in the Snap Hoop. Now why does this work?  This is because her applique designs in the Stipple collections are all raw edge. She does layer after layer in the hoop until the entire design is done. Only then does she remove the hoop and cut around all of the edges. By doing it this way, she removes the possibility of the fabric slipping from the constant removal of the hoop from the machine by not removing the hoop until it is done. (You can see this process in a video here.)

This is a great idea if you like raw edge applique! I happen to use the more sturdy satin stitch around the edge of my appliques but again that is because I do a lot of baby items and they get washed frequently and it will hold up better. The kind of items that the Stipple kits make won't need that amount of sturdiness and it works well.

 The point of me writing this post is to make sure you are all well informed on the pros and cons of each item. I still use the Snap Hoop on plenty of other items. It was just that it was not ideal for the main items I had bought it for or regularly do.

Friday, January 27, 2012

Another Wedding Throw

Back in May, a good friend of mine got married and I made her a wedding throw. She loves everything Disney (she had the cutest Cinderella invitations) and she loves butterflies. So I decided to combine those into a throw for her using the embroidery and fabric.

These embroidery designs are from the set here at Embroidery Library. Now let me tell you, these designs are INTENSE! First off, I did not like the color combinations they used because they were not like colors used in the movies. So I went in to edit the colors and it turns out when they used a color, they combined it with all the other items they made in that color (which makes sense to avoid unnecessary color changes). But unfortunately, I wanted the dress in a different color and then all of the sudden it would change the birds too! Because they had set the colors up to make the dress and birds blue. But I wanted a pink dress and blue birds. Argh!

I had to spend hours separating colors and designs and making new color stops in the designs so that I could make them perfect. So what started out as designs that had maybe 27-30 color changes, now morphed into designs with 40+ color changes! Yikes! So you can imagine how long these took to stitch out. Not only that, choosing the colors for each design took awhile and then keeping them in order while they stitched. Each design took easily around 3 hours to stitch. So if you plan on using these designs, keep that in mind. Would I do it differently? No way! These designs are absolutely gorgeous!!  (Make sure to use a heavyweight stablizer--these are stitch intensive)

Here are some close ups.

Snow White

Alice in Wonderland

Cinderella (I did some major sparkle work on that slipper...its beautiful)

Sleeping Beauty

Anyone know who this is? Random princess and prince?


Lastly, here is a good look at the label I made for the quilt.


I don't know if the pictures do this quilt justice. Can you see the pretty fabrics? They are sparkly! And the butterfly I embroidered in the center of each star block? You will just have to take my word for it! And the best part?? She loved it!

Saturday, November 20, 2010

The Professional Tote Bag

I finished cutting my materials for  The Professional Tote by The Creative Thimble. The fabric and embroidery I am using is so exciting and different! I cannot wait to get started and let you know how it goes. It seems to be a pretty involved bag (check out the description here to see all the cool things the Professional Tote can do) so I will keep you posted on how hard certain steps are or if the going is easy. I can say right now that the cutting went quickly--the layout diagrams were extremely easy to follow and the labels for which pattern piece you are cutting are very helpful. I also added embroidery to key places—you can see I am really personalizing this to my crazy tastes!  The monogram embroidery will be the front pocket. (I digitized this design myself using a font called Moonstar) The vampyr embroidery is for the travel strap that you can use to put the bag over the handle of wheeling luggage.(This design came from Urban Threads, but I tweaked it by removing the leaves and the E and the end of Vampyr...there is no E!)

The skull damask design is for the back pocket. (This design is from Embroidery Library)

I’m so excited to see how this bag will turn out! I started this bag last night at my Sewing Circle and my friend started cutting her bag out. She is using Michael Miller Fairy Frost fabrics in the most gorgeous lavender and purple!  So beautiful...if I make another of this bag I'm definitely going with Fairy Frost fabrics. Probably in yellows and corals.  (I used Fairy Frost fabrics on the table settings I showed you on an earlier blog, the green and the gold, but I chose the few Fairy Frost's that have glitter overlaid on them. Most of the Fairy Frost's just have the beautiful sheen without the actual glitter on them.)

So as a result of last nights sewing circle, I have included pictures of the front and backs of the bag which is as far as I got. It seems to be going along pretty quickly, and I haven't had a single tough spot in the directions so far. I am pleased as punch!

Thursday, November 18, 2010

Wedding Throw

Two good friends of mine got married recently and I did not quite get the wedding quilt/throw done I was making for them. But good news! I at least finished the quilt top finally! The top was very involved appliqué that took me forever!! The quilt pattern is called Fun in the Sun and it was actually the pattern I acquired while doing the Southern California Area Quilt Run in June. There were 37 stores this year and I visited all of them! At each store you would get a block pattern and here is the result of that. I did not use some blocks I did not like and instead exchanged two photos of the couple, repeated some of the other blocks, and made a block tailored to them. In order to understand that embroidered block, you have to understand that I am obsessed with Halloween! Everyone knows my cute skull collection and my love of vampire and skull related merchandise. This is why I chose the cute skull kitties to represent their kitties and the skull bride and groom to represent them. I don't know if you can tell, but next to that block there is Halloween Hello Kitty fabric where the kitty is a mummy! It's awesome! I made them a cat bed out of that fabric because she LOVES hello kitty so much and I love Halloween! Here is Sasha (one of their cats) in the bed! (sorry about the light but it's the only photo I have—isn't she cute?) They will definitely never forget where it came from! These two will love the throw and the fun in the sun pattern was perfect. Now all I need to do is sandwich this quilt and quilt it. Like how I said "all" I need to do? Ha! But I will get it done! (and you all will get to see how long it takes me haha)
Locations of Site Visitors