Pages

Showing posts with label wedding. Show all posts

Wednesday, October 24, 2012

Halloween Wedding Wednesday-Envelopes and Stamps


I literally had every tiny detail planned out for my wedding. All the way down to stamps...and even putting skeleton faces on the portraits and pictures in the ballroom of the reception since I did not like them---but I am getting ahead of myself. One detail I used was envelopes and stamps. The ones I am covering here today were strictly for my Save the Dates. I used completely different items for my invitations for the wedding and for the shower invitations. Everything had to fit the theme of the event.

These are the envelopes I picked out for the Save the Dates--also from Vistaprint.


I also printed the addresses on them using my computer and printer and the envelopes and labels function in Microsoft Word. To maintain continuity, I did the name of the couple or person in Blood of Dracula again, and then address in Decadenta Frax again.

The stamps we used for the Save the Date were these adorable ones we found on Zazzle.

http://www.zazzle.com/halloween_postage_stamps-172248098685649172
Lastly, I sealed the envelopes with these amazing Martha Stewart Halloween stickers. Just in case the Save the Date, envelope, and stamp wasn't enough to get our point across :)

They were three dimensional stickers with all sorts of fun designs that really added the finishing touch. I do want to add a word of caution though...make sure you check on the weight AND WIDTH of what you are sending before buying your stamps. Luckily we did that ahead of time so we were okay. But what we did not do was make sure everything was hand cancelled and things got smooshed in the mail. Make sure to have everything hand cancelled. Especially since we had a three dimensional sticker. Hand cancelled just means it does not go through the machine so things do not get bent out of shape. You should definitely do that for your wedding invitation too...of course we didn't and some of ours ended up to people in pieces...but I am getting ahead of myself aren't I?

There are many other Halloween themed stamps on Zazzle. A super cute one for a wedding might be this one:

If only that one was available...I might have incorporated it in as well.
And the great thing about that website is, you can get almost everything coordinated. From envelopes, to invitations, to stamps. Take a minute to browse.


Do you think these were the right pieces to go with the Save the Date from my previous Wedding Wednesday post?

Wednesday, October 17, 2012

Halloween Wedding Wednesday-Save the Date


Today we start with the Save the Date!  A save the date is important for a Halloween wedding, especially if you are doing it the weekend of Halloween, because others might schedule Halloween parties. So getting out the save the date a good five months in advance is a must! I think we just barely missed the 5 months mark but that is because we wanted to use a picture from our engagement photo session on it and of course I did not schedule the photo session enough in advance!

We had an idea of what we wanted for our save the date and told the photographer and we tried a bunch of pictures at our engagement session to nail down what we wanted. As I stated in my engagement photos post, it is all trial and error. Unfortunately what we had tried and had as our idea, did not translate for us in the photos. It was just not what we were looking for.

These are the first try....does not fit our theme
This is part of what helped us realize that we like smiling...


Luckily, we had the worlds greatest photographers and when she heard this, she agreed to do another session, completely free, to get that exact picture and look we wanted. And when we showed up she had tons of new ideas and ways to do the pose so we could be sure to find exactly the photo we wanted. And you know what? It worked! We found it and our save the date could not have been more awesome!

This is it!
This finally hit the nail on the head! This fit our theme...fun Halloween. This was campy, old horror movie style. And it worked perfectly for what we wanted. The final save the date looked like this!


You can see the addition of fangs on this one.....and yes we
did require people to wear costumes...more on that to come

We had these printed onto magnets using Vistaprint. The fonts we used were Blood of Dracula (save the date), Grapefruit (formal invitation to follow [that link will lead you to what the font looks like, but I had it in my Microsoft Office...it came with it]), and Decadenta Frax (everything else). By making it ourselves, we were able to include a skull (gotta have skulls!) and the cutest little heart spider...because I love hearts and sparkles and things.

We also had an accompaniment to the save the date printed on cardstock to give all the major details, like hotels, events, etc since the magnet had limited space. If you want to see that, send me a private message. Most of the info is not something that should probably be posted on the internet but if you would like the general idea of the theme and how I put it together, I would be happy to send it out personally.

What do you think of the save the date? Did it capture our message?

Wednesday, October 10, 2012

Halloween Wedding Wednesday-Venue


Venue for a Halloween wedding can be so many different things. The idea is to think about the venue that will most fit the way you are interpreting the Halloween theme. For us that meant the Queen Mary. It is haunted, the boat has all the original wood paneling and ambiance, plus Dark Harbor!


The year before our wedding, I had gone to the Queen Mary's Dark Harbor and it was awesome!  It is the Queen Mary's version of Haunted Halloween mazes and such. A lot of theme parks do special Halloween haunted nights around Halloween time and the Queen Mary definitely participates. It is not as big as theme parks, but the mazes are better...I think so anyway. And it is not as crowded. Anyway, the prior year I had discovered this amazing photobooth type guy that I had to have for our wedding. The first thing I did when we decided it would be a Halloween wedding was to call that guy and make sure he was available since I knew he would also be doing the Dark Harbor again. Second, I booked the Queen Mary. I know that seems backwards but that is how great this guy's services were. And that's all I am saying about it for now...you will have to wait and see!

We were lucky to get scheduled in the Queen Mary. We started talking about the wedding end of April but officially got engaged in May. We were soooooo lucky that they had a place left on the last Saturday of Halloween on such a prime venue as the Queen Mary. (Yes we planned and made this happen fairly quickly---What can I say? When you know, you know!) They have three ballrooms and the only ballroom they had left (Verandah) was for about 100 people which was exactly what our estimate was. It was meant to be!


But you are not here to just listen to my venue. Other great ideas I have seen are weddings in cemeteries. A lot of large cemeteries actually have weddings and areas. There have been plenty of weddings in haunted mansions. I would have loved to do something like the Winchester Mystery House (but I no longer live in Northern California).  In fact, my mother tried to get the Winchester Mystery House for my Bat Mitzvah (October 28, 1995) since it was around Halloween and we all know my fun tendencies but it was booked on the Halloween weekend dates 5 years in advance! Yikes!


What else?  I'm sure there are other haunted ships to use. What about theme parks? I know you can get married at some, I wonder if some will let you get married there during their haunted night festivities?  And then there is the classic, a backyard or outside. There are so many great ways to decorate backyards and outside for Halloween themed weddings.

Any other ideas?  Please comment your genius thoughts!

Wednesday, October 3, 2012

Halloween Wedding Wednesday-Engagement Photos


Today I am starting a new series called Wedding Wednesday!  As my readers might know, I had a Halloween themed wedding on October 29, 2011. A LOT  of it was DIY. I remember how hard it was to find good resources on ideas for Halloween weddings so in response to a few emails, I thought I would do a series where I highlight some of what was done. I will attempt to go in order...from the beginning to the end.

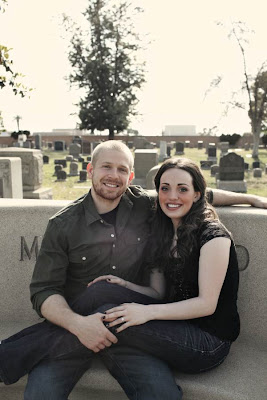
First up we have engagement photos. These are photos you might use for your wedding website, save the date, wedding decorations, around the house, etc. But to be sure, you will use them at least at some point for your wedding. So it is important to set the tone from the very beginning. Our tone was---Halloween! But we were doing fun, campy Halloween...not evil scary. So we did our engagement photos in a graveyard but with lots of smiles and fun. Here are some of them to give you an idea.


It is a good idea to ask your photographer to add some cool filters when they are fixing the photos. You can see some filters in use in these photos.


My husband and I were both gymnasts...we met 10 years ago coaching gymnastics! I was in heels so I couldn't do the same thing as him...I'm amazed my heels didn't stick in the grass


Make sure you check ahead of time for permits or requirements for photographing in a cemetery.  We found that one cemetery we wanted in Redondo Beach wanted $1400 for even just a one hour session! Also Hollywood Cemetery wanted $400 for an hour. Just make sure you check into those things so you are not breaking any rules.


The good thing about having an engagement session is learning about what pictures you like best. We took all kinds of pictures. But when we got the proofs, we could see that serious style pictures were not for us. We preferred the ones where we were smiling and we were able to translate that to optimize our wedding pictures.


I love how cool this photo turned out

same heels I wore to Promaballoona!


This is my favorite photo of all of them and my favorite filter...it makes us kind of look like ghosts!

Lastly, I want you to know who my amazing photographers were. We used Karen Leah Photography. We researched a lot of blogs and styles before deciding on them. And they were fantastic! Truly amazing...wait until I show you some of the wedding photos. We HIGHLY recommend them.

You can check out a sneak peek of things to come by looking at her blog post of our wedding.

I hope this helps get the ball rolling with some inspiration.

Friday, January 27, 2012

Another Wedding Throw

Back in May, a good friend of mine got married and I made her a wedding throw. She loves everything Disney (she had the cutest Cinderella invitations) and she loves butterflies. So I decided to combine those into a throw for her using the embroidery and fabric.

These embroidery designs are from the set here at Embroidery Library. Now let me tell you, these designs are INTENSE! First off, I did not like the color combinations they used because they were not like colors used in the movies. So I went in to edit the colors and it turns out when they used a color, they combined it with all the other items they made in that color (which makes sense to avoid unnecessary color changes). But unfortunately, I wanted the dress in a different color and then all of the sudden it would change the birds too! Because they had set the colors up to make the dress and birds blue. But I wanted a pink dress and blue birds. Argh!

I had to spend hours separating colors and designs and making new color stops in the designs so that I could make them perfect. So what started out as designs that had maybe 27-30 color changes, now morphed into designs with 40+ color changes! Yikes! So you can imagine how long these took to stitch out. Not only that, choosing the colors for each design took awhile and then keeping them in order while they stitched. Each design took easily around 3 hours to stitch. So if you plan on using these designs, keep that in mind. Would I do it differently? No way! These designs are absolutely gorgeous!!  (Make sure to use a heavyweight stablizer--these are stitch intensive)

Here are some close ups.

Snow White

Alice in Wonderland

Cinderella (I did some major sparkle work on that slipper...its beautiful)

Sleeping Beauty

Anyone know who this is? Random princess and prince?


Lastly, here is a good look at the label I made for the quilt.


I don't know if the pictures do this quilt justice. Can you see the pretty fabrics? They are sparkly! And the butterfly I embroidered in the center of each star block? You will just have to take my word for it! And the best part?? She loved it!

Wednesday, January 25, 2012

A Year's Break.....and yet another Professional Tote!

I'm back! I know I took a break for a year but I'm back and going to try to be more regular on posting my projects and also posting reviews on patternreview.com.  The reasons I left for so long, first I got engaged, then married, then honeymoon, then new job....it was all so crazy and blogging fell by the wayside!  I had a Halloween themed wedding on October 29, 2011 and it was incredible! I will post pictures periodically of things we did because it was sooo hard to find Halloween wedding resources and ideas. So if mine can help someone, that is great!


 Anyone who has read my blog from before knows my love of the Professional Tote (see here, here, and here) and I had already made two! Well I made a third last year for my brother to give to his girlfriend on Valentines Day. This one was my favorite of them all.
front
back

I used notions from the Creative Thimble's website (the designer of the pattern) for this bag. I also used her purse feet which work extremely well for this pattern seeing as it is a travel bag and is frequently set on the ground. I also used her cording in lime green, the cord stops in lime green, and the special zipper. This zipper is far more heavy duty and works much better to close up the top of the bag.
heavy duty zipper and decorative stitching
I also used decorative stitching on many of the pieces to add a bit more pizazz!  (As though the fabric was not pizazzy enough already!)
inside view
Everyone who I have made this bag for (myself, mother, and brother's girlfriend) have loved it to death and we use it every time we travel. Or for me, I use it when I go to shows as well to carry all my purchases!  As an update on the one I made well over a year ago--I still use it all the time and it has held up well. No problems whatsoever. Oh wait I lied. There is one problem. I did my embroidery on the front of mine with my initials. Only problem is, I since got married and now have new initials! Guess I have to make another one...... :)

On the next one I make, I intend to try to use this new product instead of the regular Decorbond interfacing. It is called Soft and Stable and I think will alleviate the problem of the fabric separating from the fusible decor bond around the top. (It is hardly noticeable but if I am making another...I may as well try to improve!)

I will also be posting a tutorial soon on how I do the hang ties on the zippers of all my bags so stay tuned!

You can see my review of this pattern here.

Thursday, November 18, 2010

Wedding Throw

Two good friends of mine got married recently and I did not quite get the wedding quilt/throw done I was making for them. But good news! I at least finished the quilt top finally! The top was very involved appliqué that took me forever!! The quilt pattern is called Fun in the Sun and it was actually the pattern I acquired while doing the Southern California Area Quilt Run in June. There were 37 stores this year and I visited all of them! At each store you would get a block pattern and here is the result of that. I did not use some blocks I did not like and instead exchanged two photos of the couple, repeated some of the other blocks, and made a block tailored to them. In order to understand that embroidered block, you have to understand that I am obsessed with Halloween! Everyone knows my cute skull collection and my love of vampire and skull related merchandise. This is why I chose the cute skull kitties to represent their kitties and the skull bride and groom to represent them. I don't know if you can tell, but next to that block there is Halloween Hello Kitty fabric where the kitty is a mummy! It's awesome! I made them a cat bed out of that fabric because she LOVES hello kitty so much and I love Halloween! Here is Sasha (one of their cats) in the bed! (sorry about the light but it's the only photo I have—isn't she cute?) They will definitely never forget where it came from! These two will love the throw and the fun in the sun pattern was perfect. Now all I need to do is sandwich this quilt and quilt it. Like how I said "all" I need to do? Ha! But I will get it done! (and you all will get to see how long it takes me haha)
Locations of Site Visitors